Introduction
Conquest of Elysium 5 is a quick turn based fantasy strategy game with a touch of rogue-like. The game is full of depth, details and monsters. There are also a huge number of factions, each with its own unique gameplay and magic rituals.
The main focus in the CoE series is that each race plays differently. We’re not talking about a unique building here and a unique unit there, we’re talking about completely different playstyles, with different mechanics and different goals. Perhaps you’re playing a druid, focused on amassing a vast forest and jungle empire from which to harvest ingredients to summon creatures of the woods with no practical need to conquer mines. Perhaps you’re a dwarf, who’s only concern is mines and produce units at a set rate every turn, focused almost entirely on upgrading those units to survive as long as possible since they are so difficult to replace. Perhaps you are a Scourge Lord, who’s pyramids of power drain the very life force from Elysium and channel it to him and his Heralds. With 24 different factions that alone is enough to keep your play dynamic as you vie for control of the map to conquer Elysium.
New for the 5th version of Conquest of Elysium is four additional planes to interact with, boats and ports which enables players to travel to islands beyond the main continent of Elysium, three new factions, new rituals and summons for the existing factions, new battle maps for different fortifications, new independent factions that fight each other, new monsters, more and different random events, and much more.
The game has ten different planes. There is for instance an Infernal plane that is the home of the devils and the demons. So if a demonologist manages to summon a demon lord, there will suddenly be a dark citadel without its master in inferno. Banishing a devil will force it back to inferno instead of slaying it permanently. Although extremely difficult it is possible to permanently destroy a demon lord by storming inferno and slaying it on that plane. Although there are many planes you will only rarely have to visit them. But they continue to run in the background and make certain actions or random events more exciting. Among the new planes in CoE5 is the sky-realm above Elysium. From the clouds flying armies might descend upon the inhabitants of Elysium, only to take to the skies and retreat if their losses were significant. But the clouds are not unattainable. Beanstalks, rainbows and tall mountain spires allow ground-born armies to ascend to the clouds.
Most factions start with a random set of rituals, a random set of combat spells and together with the random map that will ensure that no two games are the same. More rituals and spells can be learned during the game if you have the right resources and find the right locations. In addition to the aggressive wildlife of Elysium there’s also random events to contend with, from bumper harvests and bandits, to the very gates of the underworld opening into Elysium. Your hands will be full before you even make contact with the enemy.
Winning and Losing
The player that is last left standing wins the game, or in team games, the team that is last left standing.
A player is eliminated if he either loses all his citadels near Elysium (the Elysium, Sky or Agartha planes) or if he loses all his commanders. The elimination happens instantly, so if you only have a single citadel, make sure to guard it properly.
Main Menu
When Conquest of Elysium 5 loads, the Main Menu screen comes up with the following items:
-
Start New Game (s)
-
Load Game (l)
-
Network (n)
-
Preferences (p)
-
Mods (m)
-
Credits (c)
-
Read Tip (t)
-
Quit (q)
The letter in parenthesis is the keyboard shortcut key that can be used instead of clicking with the mouse.
Start New Game
The Start New Game option begins a new game of CoE5. Usually this is the first thing you want to do.
Choose Participants.
Creating a random map begins with choosing the world size for the game.
Map Size
Choose one of five different map sizes:
-
Small (40 x 28 squares)
-
Medium (50 x 36 squares) (default size)
-
Large (60 x 44 squares)
-
Huge (70 x 52 squares)
-
Enormous (78 x 60 squares)
While the world sizes may seem small, do not let the numbers fool you. The relative size of the world will become apparent during gameplay when you move your troops around and the larger worlds are exactly as large as advertised.
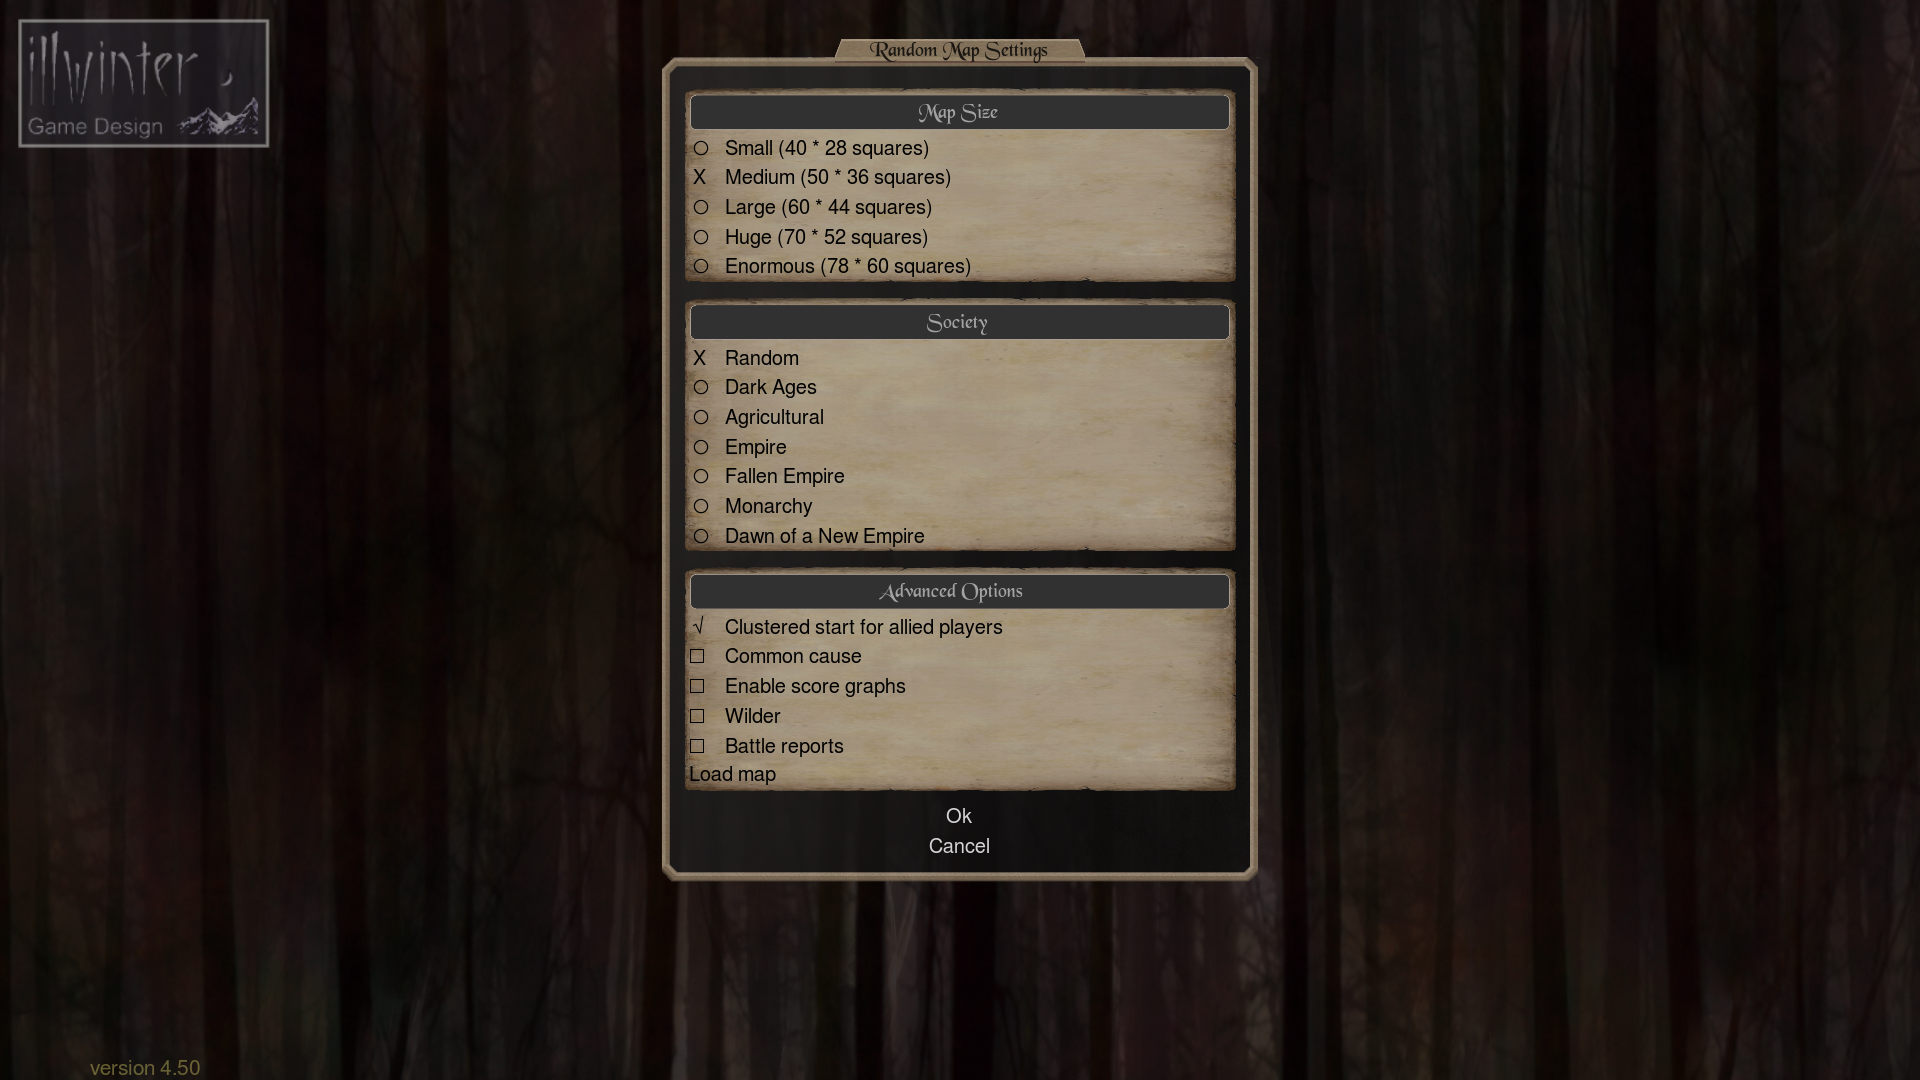
Choose Society
There are six different societies to choose from. The choice of society affects what kind of opponents and resources you are likely to find in Elysium. The choice can be random, in which case you won’t know which society it is until you have researched the history of Elysium in a magic library.
Dark Ages
Dark Ages is the period of time when man first comes to Elysium. Ruins of long-dead civilizations lie scattered through the realm and dragons roam the lands. Fairy courts and dwarven cities are not yet destroyed. Human influence is weak and the forces of nature strong.
There are few villages and even fewer cities in these early times.
Agricultural Period
After the end of the Dark Ages comes the Agricultural Period when man subdues the wild lands of Elysium. Cities are rare, but hamlets and villages lie in every corner of the continent. It is a time of heroes, pioneers and cunning brigands.
Empire
The lands of Elysium have been unified into an Empire, forged from the colonies of the pioneers. The Emperor is popular among the citizens and a great capital city is being built from which he can rule. Forests are cut down at a swift pace to found new cities for the growing population. New military units are being developed to hunt down outlaws and to deal with the remaining aggressive wildlife. The groups of brigands that were a scourge of the land in earlier times have been almost completely eliminated.
Fallen Empire
The waning days of greatness have given way to the Interregnum. The Empire has fallen. Battlefields and ruins of former imperial glory litter the lands. Few cities and villages remain. Human lands are in chaos and bandits are free to roam the countryside. The forces of nature are growing continuously stronger and have reclaimed much land from the human inhabitants. Even worse, great acts of evil have been performed in the capital, which has been turned into a stronghold of dark powers. Only a powerful leader will be able to rebuild the Empire.
Monarchy
From the ruins of the fallen Empire, a Monarchy has emerged. Feudal lords rule their estates from towers of stone, gathering power and influence in service to the king. The land is more peaceful than before and the taxes of villagers pay for troops to protect them from brigands and to keep the forces of nature at bay. There are many fortresses and towers, but the cities of the empire have yet to be rebuilt.
Dawn of a New Empire
Slowly and painstakingly, Elysium is returning to the glories it knew during the days of the Empire. Cities are growing once more and the future of humankind looks bright and promising. But the hard years of the Monarchy are not forgotten and a Council of Elders has been formed to rule humankind and to keep anyone from proclaiming themselves king. The Council rules from the largest city, but it is not nearly as large as the capital of the old empire.
Advanced Options
Clustered start for allies
Allied players start very close together on the same side of the map and as far as possible from other teams.
Common cause
A player is only defeated if no one on the team has a commander or a citadel. In other words, all members of a team must lose all commanders at the same time or all players on the team must lose all citadels.
This setting has no effect if there are no teams.
Enable score graphs
When checked, this option allows viewing score graphs during the game. If not checked, score graphs can only be viewed after the game is over.
Wilder
This option will make independents much stronger. If the Wilder option is enabled you will find it much more difficult to conquer squares and get increased income. Elysium as well as the other planes are affected by this setting.
Battle reports
Enable this option to get battle reports among the other messages for any battles that might have been observed. No battles will be shown as they happen, when this option is set they can only be viewed afterwards.
Setup Participants
There can be up to a maximum of sixteen players in a game. All can be set to either human controlled or computer controlled (AI controlled).
Pressing the n key in the Choose Participants screen adds a new player. A player can be deleted by clicking the <del> text on the corresponding row.
The color of each player is listed next to the player slot. If you want to choose a particular color in the game for a player, simply click on the color tab next to the player and choose a color from the palette.
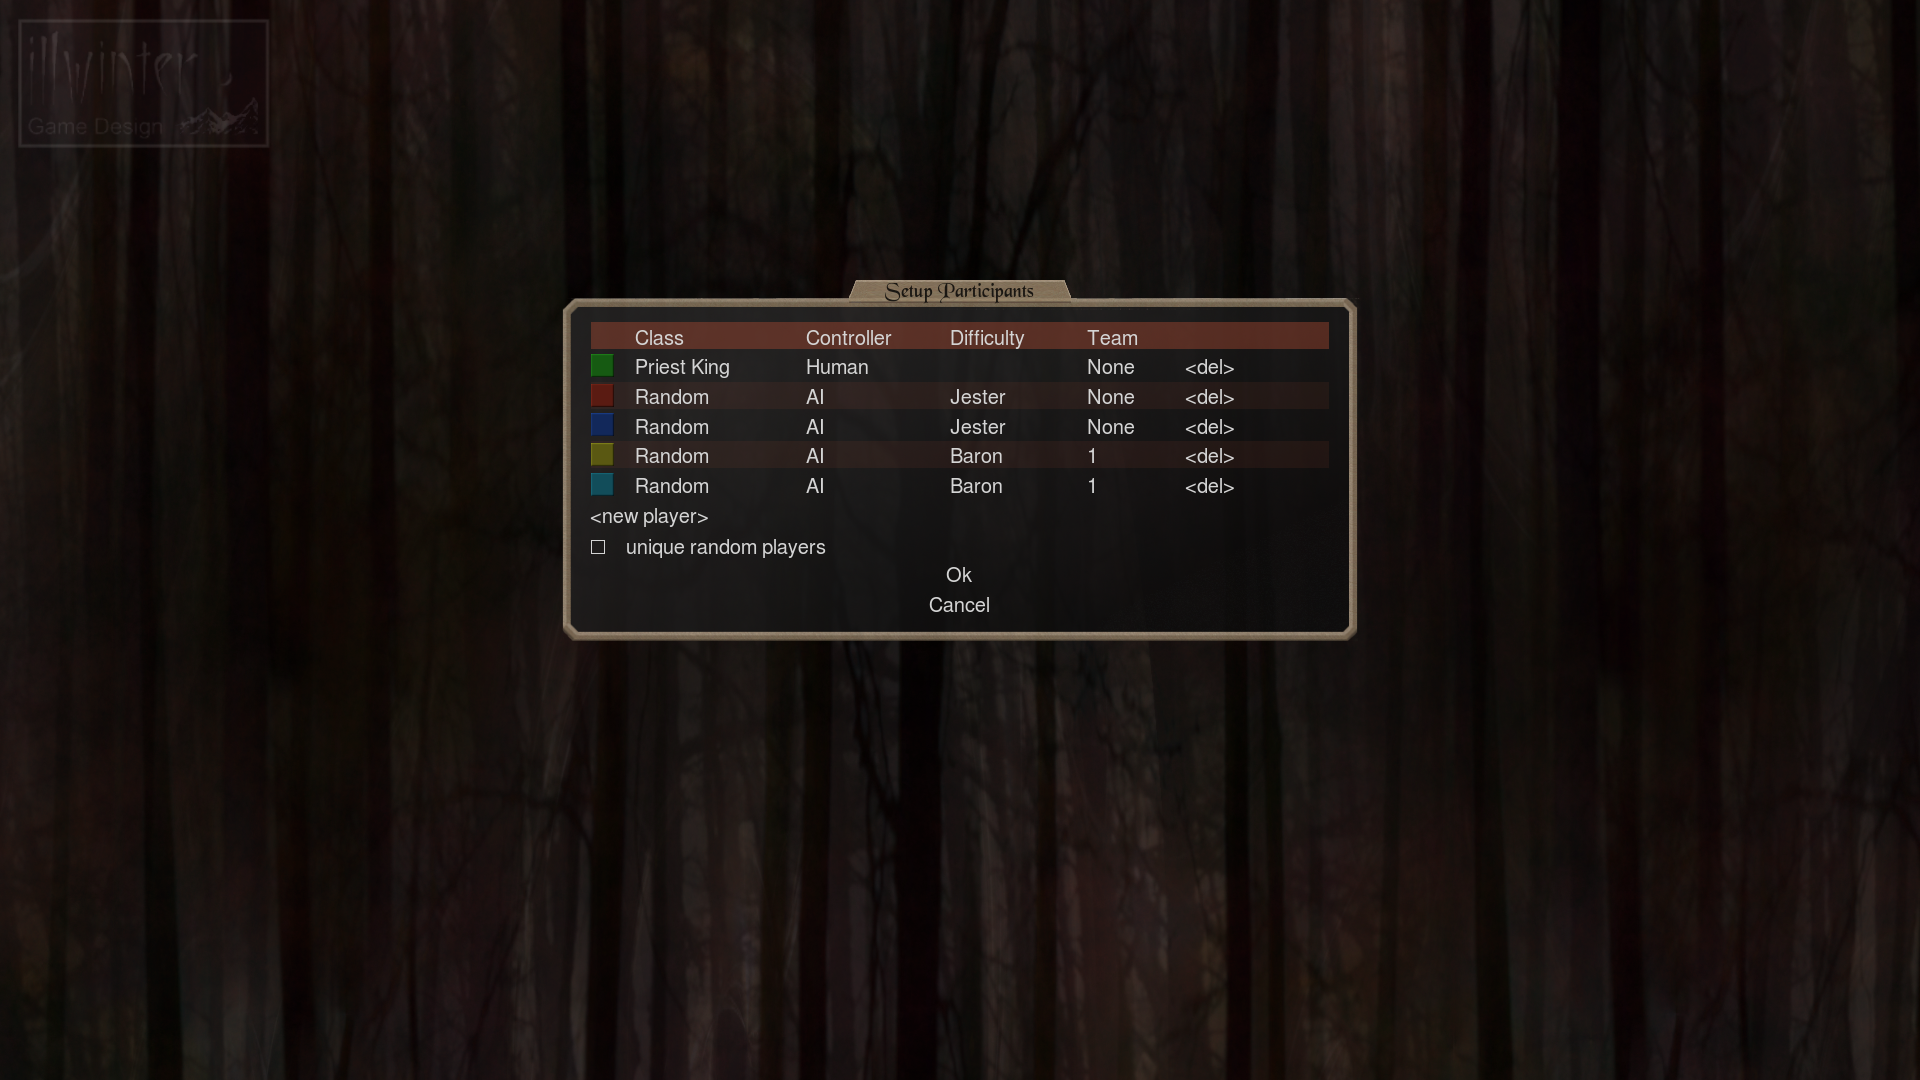
Players can also be assigned to teams of allied players by clicking on the Team column. The default team for each player is none, but team numbers 1 – 6 can be set for each player. Allied players have advantages such as sharing map vision and being able to move through allied map structures and armies.
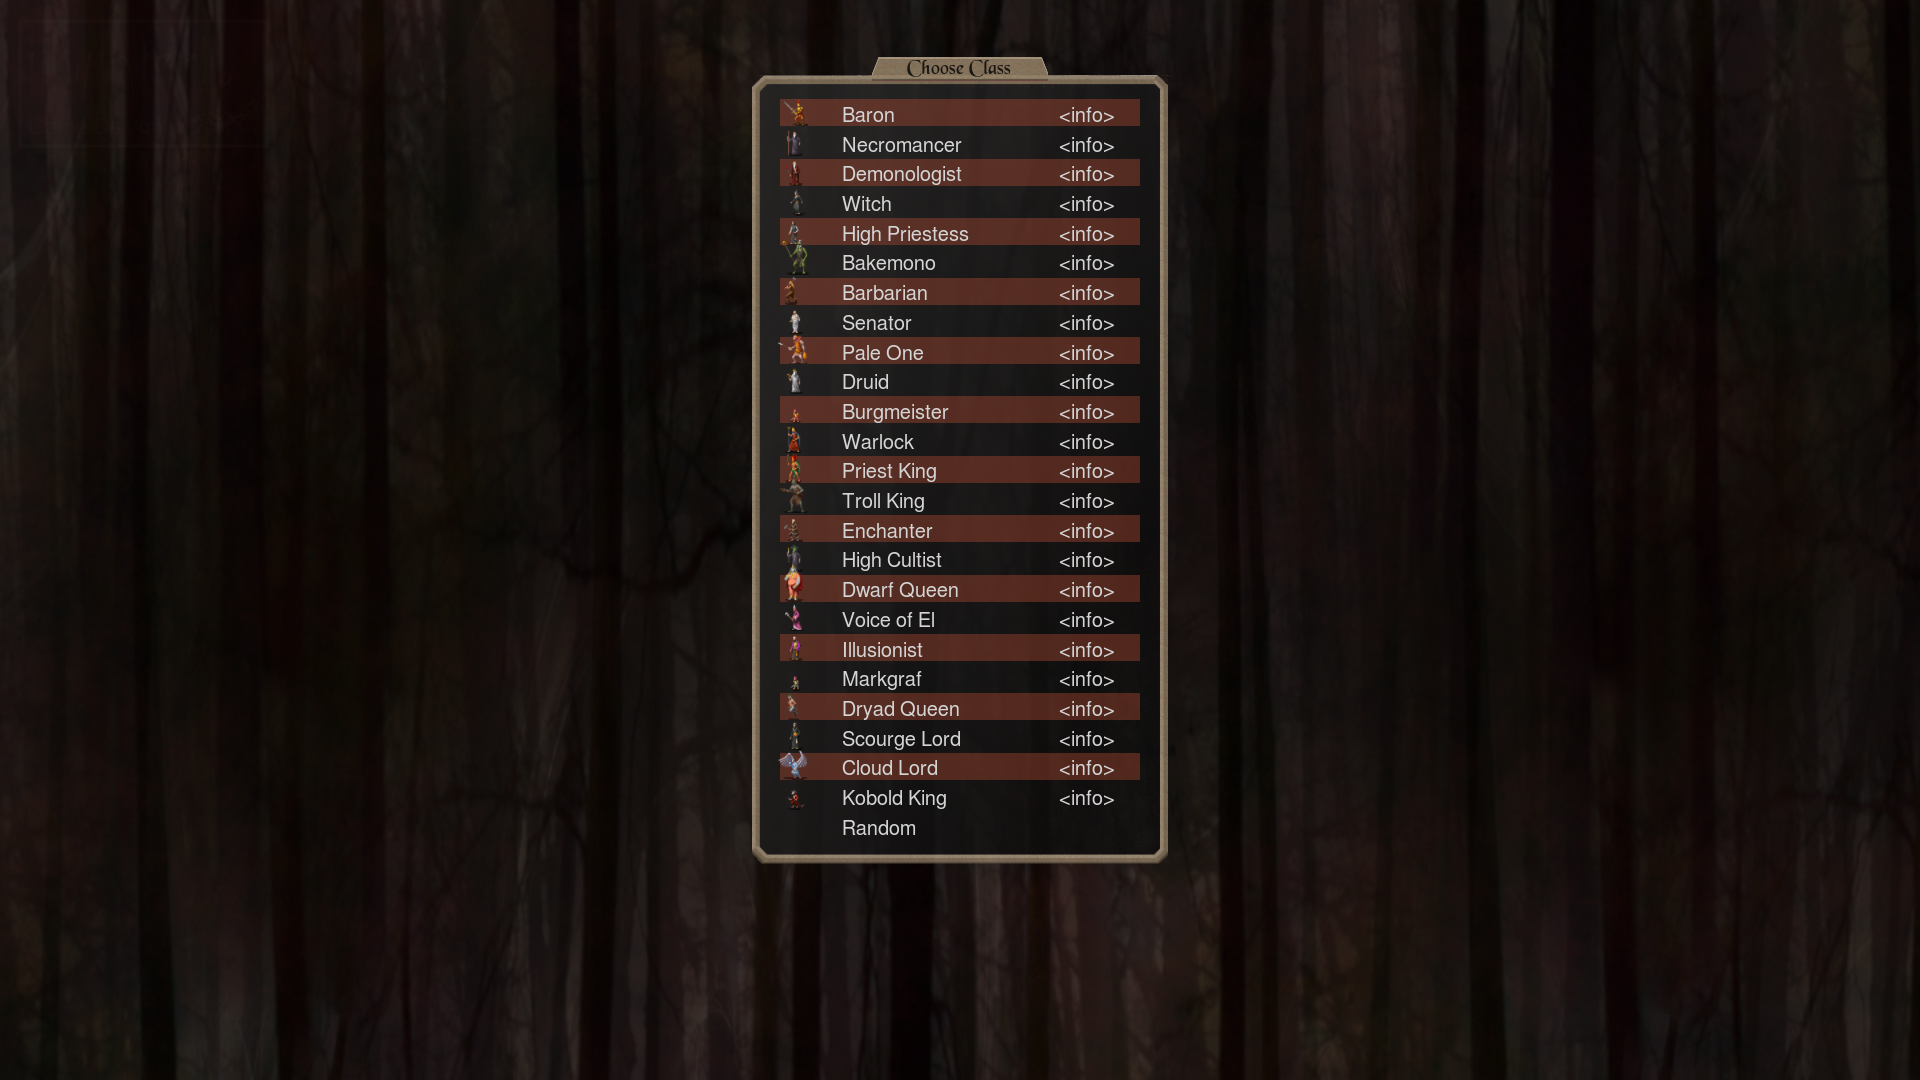
The class of each player can be determined randomly (default) or selected from a list, which opens the Choose Class menu. There is a short introductory text for each class available from the <info> button of the Choose Class screen. See chapter Classes for more detailed information on the various classes.
If the unique random players checkbox is enabled, there will only be one player of any given class.
There are ten different levels of difficulty that can be assigned to computer controlled players. Computer players of a higher difficulty level gain bonuses to gold, iron and special resource income, which allows them to recruit more troops, summon more allies and absorb losses much more easily thus making them more difficult to defeat.
AI players get a bonus (or malus) to their income and starting army depending on the chosen level. Apart from this bonus they follow the same rules as human players. This means they also follow the usual rules regarding what squares they are aware of but they will often use scrying rituals if possible, enabling them to gain information about resources far away. They also risk getting knocked out by stealthy independents just as easily as any human player.
The AI difficulty levels and their income bonuses are listed in the table below. Levels with a positive bonus also get extra starting units, but this bonus is smaller than the income bonus.
| AI Level | Income bonus |
|---|---|
Piss Boy |
-25% |
Jester (default) |
0 |
Butler |
25% |
Knight |
50% |
Baron |
75% |
Count |
100% |
Marquis |
133% |
Duke |
166% |
King |
220% |
Emperor |
300% |
Load Game
This function loads a previously saved game. Saving the game is done from the File Menu (press F10 / F11 / F12 in game to open the file menu).
Deleting Saves
You can delete old save games by pointing the mouse cursor at the file in the load screen and pressing Delete. The game will prompt you to confirm the file deletion.
Save Game Directory
Usually you never need to access this. But if you need to backup your save files it might be good to know where it is located.
The directory for storing saved games is different depending on the operating system.
-
Linux: ~/.coe5/saves
-
Mac: ~/.coe5/saves
-
Windows: %APPDATA%/coe5/saves
The %APPDATA% is an environment variable, which defines where the user data directories for any applications a Windows user has installed are stored. It points to the application data directory.
In Windows XP this directory is C:/Documents and Settings/[username]/Application Data/
In Windows Vista and Windows 7 the directory is C:/Users/[username]/AppData/Roaming/
The directory is normally hidden, so you must have the viewing of hidden files and folders enabled to see it. Even if it is not visible, you can get to the directory. Just type the path %APPDATA%/CoE5 in the Windows Explorer address bar and press Enter and the directory will open.
Network
This section deals with instructions mainly on how to set up your own game server for Conquest of Elysium 5 and connect to it. If you just want to play an online game the easy way you should use the Game Lobby.
Game Lobby
To enter the game lobby click on Network / Enter Game Lobby. From here you can create new games, or join a game that someone else has created.
A game created from here will be saved automatically and you can quit the game at any time and resume it later by joining it from the Game Lobby again.
Each player can have a limited number of games created on the Game Lobby and the games will be deleted automatically after about 2 weeks of inactivity.
Start Game Server
To start the game in server mode, select Start Game Server. The game will prompt you for the port to use. The default port is 7272 (TCP).
To set up a new game, select New Game after the server has been started. When starting a new game, first select map size. In the next screen, player options are displayed, but cannot be altered. Players connecting to the server must alter the game settings themselves.
The game server can be run in text mode using command line options, in which case even the settings for the games played on the server can be automated (see Chapter Command Line Options for more information).
Once a game has started, the hosting server has little control over how the game is played and most of the power is transferred to the players. See below for more information.
Connect to a Game Server
To connect to a game server, select the Connect to a Game Server option in the Network menu.
The game will prompt you for the IP address of the game server you wish to connect to. The IP address must be known beforehand and it must be an address open to the public internet or an address in the local network that the computer can access.
How to Determine Your IP Address
If your internet connection has a static IP address, the information will be available from the documents your service provider has given you. Most IP addresses are dynamic instead of static, which means that they will change from time to time, most likely when your internet connection has been switched off for a while.
The easiest way to determine the public IP address you have is to go to a website which tells you the public (i.e. visible to the internet at large) IP address you are connecting from. The easiest sites to go to are http://www.whatismyip.com and http://my.ip.fi
The first site will tell you your IP address and whether you are using a proxy, and also has some basic information on many basic structures of the internet. The second site tells you only your public IP address and nothing else.
If the game is on a local network, the addresses will have been determined by the administrator of the network or randomly assigned from a pool on your network’s internal DHCP server. Most local area network addresses start with 192, 10 or 172. In this case you must check the address of each computer participating in the game.
Note that you can also use the name of the server instead of just the IP address because the DNS system that matches server names to IP addresses will find the IP address of the server for you if you know the server name.
Configuring a Network Game
Once a game has been started by the hosting server and players have connected to it, they must select their player slot and class, determine classes for AI players, and set up teams.
This is done exactly like in a regular game, except the options to set players are:
-
Open positions are human players who have not been selected yet.
-
Me sets that position under the command of the player who selects it.
-
Another Player is a position already chosen by another human player.
-
AI is a position given over to AI control.
Once everyone has selected their position and set the class and team options, hitting Start Game will begin the game.
|
Warning
|
Make sure you communicate with all players and hit Start Game only when everyone has acknowledged being ready! The game will begin when anyone presses Start Game and it does not check whether all the players, classes, teams and other options have been set! Communication is key here to coordinate the setup and avoid unnecessary server restarts. |
Disconnecting & Reconnecting
If your internet connection suffers an outage even for a moment, you will be disconnected from the game. If this happens, you can reconnect to the server and resume playing.
You should wait for five minutes before reconnecting. If you reconnect too quickly and the server has not yet noticed the disconnection, you will receive an error message. The error message will tell you that there is already a connection to the server with your serial key and to make sure that nobody else is using it or to wait for a moment before reconnecting if you just got disconnected.
When a player reconnects to an ongoing game on a server, it is possible to reenter the game as any non-AI player, not just the one you were playing. There are both advantages and disadvantages to this. Being able to connect as anyone makes finding a substitute player easy, because the substitute can simply connect to the game and take over from the previous player.
Going AI
It is possible to set disconnected players to AI control. This can be done at the end of turn when the game gives a notification that it is waiting for a disconnected player. Turning AI cannot be reversed later. Note that it is not possible to turn a player to AI control in single player games or hotseat games. This feature is only available in network games.
Preferences
The Preferences menu governs the general game settings of CoE5. There are four tabs: gameplay, graphics 1, graphics 2 and sound.
Gameplay – Next Commander Selection
Manual selection means you must use the n key to go to the next commander with unused Action Points or find the commander you want on the map or select him in the Unit Overview (F1).
Select first commander automatically (default setting) means that the game automatically selects your first commander at the beginning of a turn, but once you’re finished giving them orders, you must manually select the next commander.
Always select next commander when out of AP means that as soon as your currently selected commander has used up all of their Action Points for the turn, the next commander with unused Action Points is automatically selected.
Gameplay – Move System
The move system can be set to immediate move when a square is clicked, or to show a movement path first (default). If immediate move is selected, commanders will not remember their destination from turn to turn.
Gameplay – Delay for AI Moves
This setting is the delay in milliseconds during AI movement, so that human players can see the AI players move when they are visible. The default value is 700 and a value of 0 hides AI movement.
The settings to show the movement of independents and allied AI is toggled on and off with a checkbox. This only applies to single player games. Games with more than one player never show any AI moves.
Gameplay - Misc
Show tip of the turn, untick this box to disable the Tip of the Turn that is shown while new turns are calculated.
End turn warning, will give a warning if you click End Turn when there are still commanders left that have Action Point remaining.
Key movement QWE/AD/ZXC, untick this box to disable movement using these keys. The numerical keypad can still be used for direct movement.
Graphics 1 – Screen Resolution
This setting governs the full screen resolution and allows the choice of running CoE5 in either fullscreen or windowed mode.
Graphics 1 – Frame Rate
Frame rate can be limited to 20, 30, 60 or 120 FPS (default is 60 frames per second). Limiting to a low frame rate will reduce power consumption, which might be useful for laptops.
Graphics 2 – Graphics Quality
Choose the quality of graphics from low, medium, high and highest.
If the Fade Effect is enabled, menus fade in when opened.
Graphics 2 – Text Size
Game text can be set to small, medium or large.
Graphics 2 – Menu Opacity
The Graphical User Interface (GUI) opacity settings are controlled by a slider with a value range of 0 – 100. The slider determines how visible the boxes around the game menus are.
A value of 0 makes the menu borders invisible and the background inside the menu box totally transparent. Menu titles will not be visible, because they are transparencies in the box. A value of 100 means the menu boxes are highly visible and completely opaque. The default setting for GUI opacity is 85.
Sound – Volume for Sound FX & Music
These two sliders with a value range of 0 – 100 control the volume of in-game sound effects (first slider) and music (second slider). The default settings are 60 for sound effects and 100 for music.
Sound – Sound Device
All sound device selection changes require CoE5 to be restarted before they take effect.
On Windows the sound options are:
-
No sound
-
Auto detect sound device (default)
-
Direct Sound
-
Waveout sound device
On Linux the sound options are:
-
No sound
-
Auto detect sound device (default)
-
JACK sound server
-
PulseAudio sound server
-
ALSA sound device
-
OSS sound device
On Mac OSX the sound options are:
-
No sound
-
Auto detect sound device (default)
-
SDL sound
-
Portaudio
Mods
Here you choose which mods you want enabled and you can also enter the Map Editor from here.
Mods can be found on the Steam Workshop. After subscribing to a mod on the CoE 5 Steam Workshop it will be shown here after it has finished downloading. Restarting the game and Steam might be required for it to show up in some cases.
The map editor can be used to make custom maps.
Kingdom Overview
At the top of the screen is the Kingdom Overview bar and it is always visible as long as you are on the Map Screen. The Kingdom Overview shows the current season, the treasury and income, plane buttons, and menu buttons.
Season and Next Turn
In the upper left corner of the menu there is a symbol that denotes the season (spring, summer, fall or winter). Mousing over the symbol brings a popup to the bottom of the main screen that tells the exact season (Mid Summer, Late Winter etc.). All games start in the season of Mid Summer.
By pressing this button or the ‘y’ key you will end the current turn and advance to the next one.
Treasury
The player’s current gold, iron, trade points and special resources as well as the monthly income for gold, iron and special resources are found next to the season icon.
Clicking the symbols on the menu gives more detailed information on the sources of each type of income. Some types of income vary by temperature and season, e.g. gold income from sources other than mines is reduced by 50% in snowy terrain. Some special resources may have production boosts during specific seasons.
Plane Buttons
The globe shaped buttons can be used to select which plane you are viewing. At the start of the game usually only Elysium is known, and there will be no other plane to look at. Once more planes are discovered, they can be selected here.
Next Commander (n)
Selects the next commander with unused Action Points who has not been set in Sentry mode.
Recruit Units (r)
Open the recruitment menu. You can also open this menu by holding down right click on a recruitment location. This way you will have the clicked on location selected by default.
Trade Administration (l)
The Trade Administration menu allows trading gold, iron and special resources in a limited manner. Trade between players is not possible.
The amount of resources the player can trade is determined by the number of trade points he controls, indicated by the icon of the cart of goods. Trade points are acquired from towns, cities, certain types of citadels and certain other special structures.
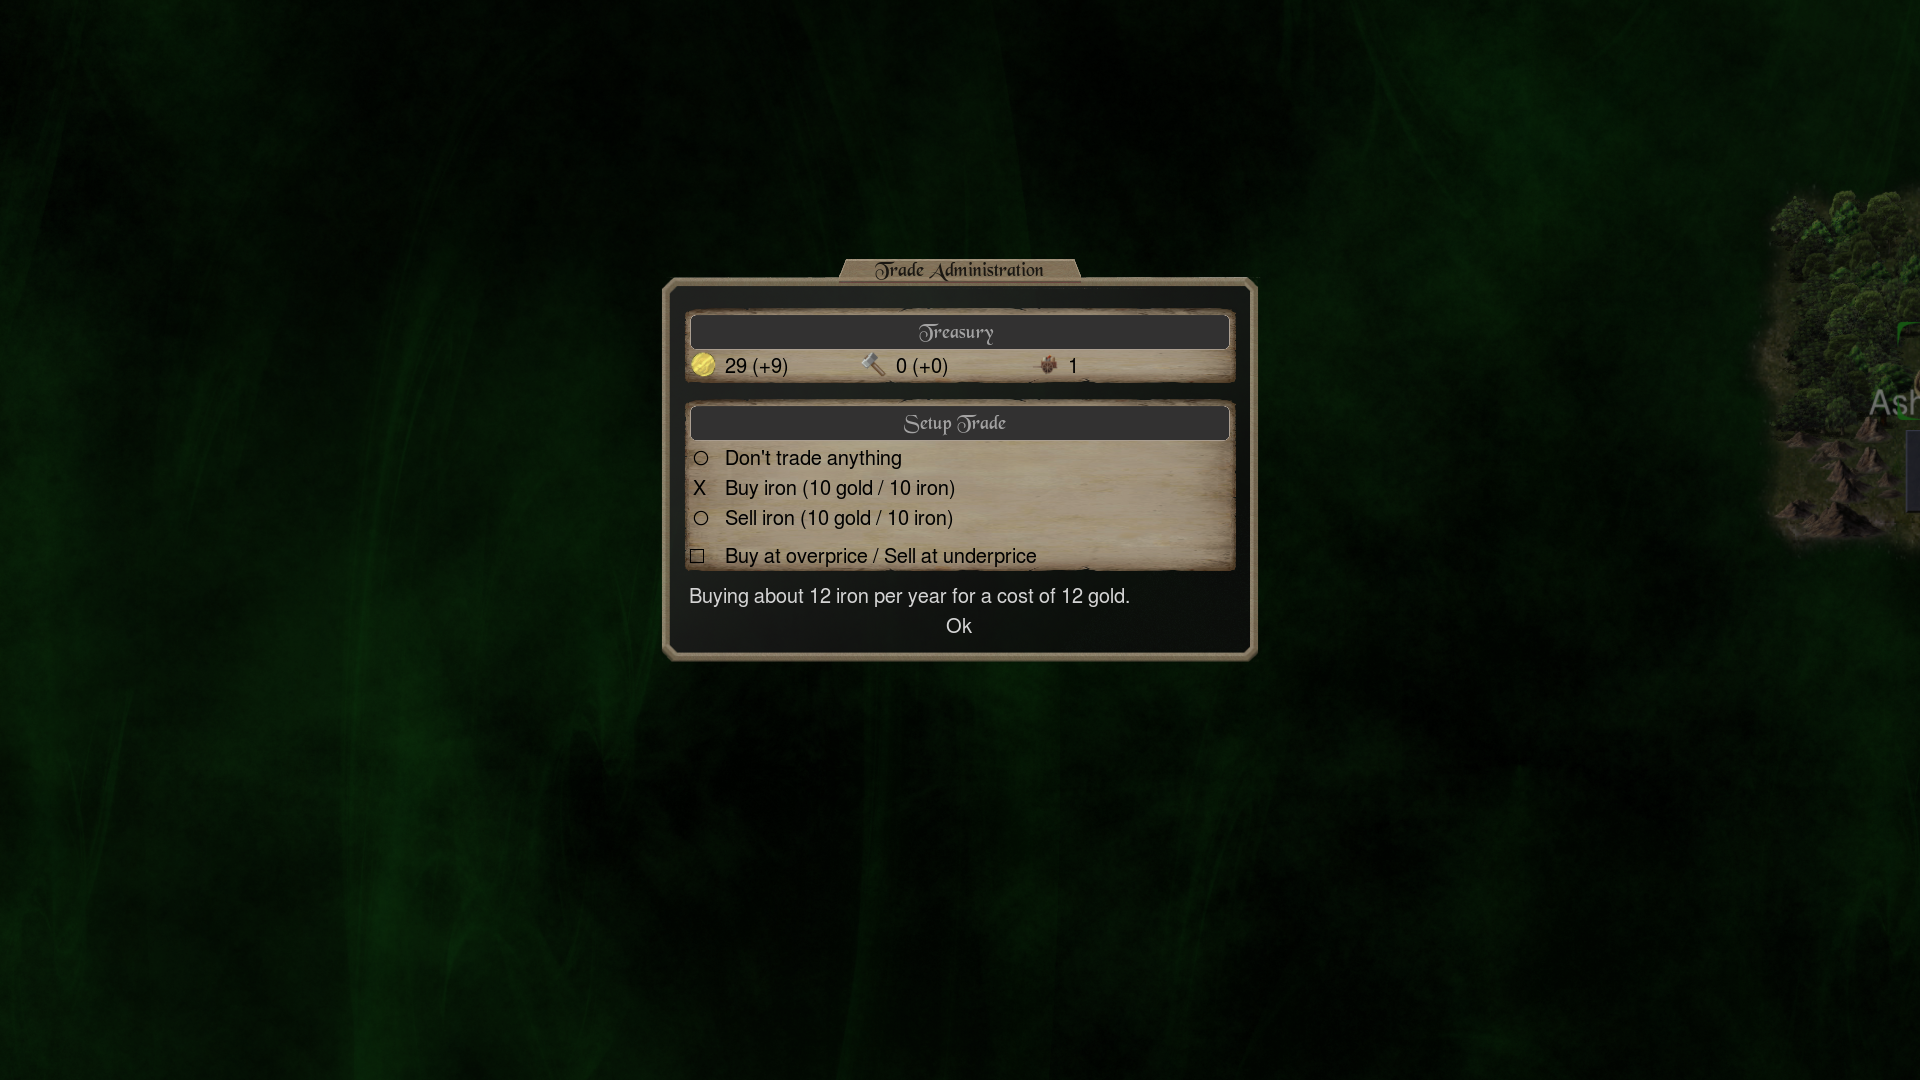
If a type of trade is selected, the player automatically makes the maximum possible number of selected trades when the turn ends.
The trade options are:
-
Don’t trade anything
-
Buy resource (costs 1 gold / trade point)
-
Sell resource (gains 1 gold / trade point)
Trading prices for special resources in gold are listed in the table below. Trading a resource costs trade points equal to the buying or selling cost of the resource. If there are insufficient trade points to make a trade, there is a percentage chance to succeed proportional to the points required. This means that it requires 2 trade points to trade 1 gem or sacrifice and 3 trade points to trade 1 hand of glory or relic.
| Resource | Gold cost |
|---|---|
Iron |
1 |
Fungi |
0.5 |
Herbs |
0.5 |
Weed |
1 |
Rubies |
2 |
Emeralds |
2 |
Sapphires |
2 |
Diamonds |
2 |
Sacrifices |
2 |
Hands of Glory |
3 |
Relics |
3 |
|
Tip
|
If the player has 2 trade points and wishes to trade a hand of glory, there is a 66% chance of a successful trade. If they only had 1 trade point, the chance of a successful trade would be 33%. |
The player can also buy resources at overprice or sell at underprice, controlled by a checkbox toggle. Buying at overprice means the player buys twice the normal amount of the resource and at double the normal price per unit. Selling at underprice means you will get twice as much gold, but it will require four times as many resources.
Messages (m)
The messages menu is automatically shown at the beginning of turn if there are any messages. Usually messages appear as the result of random events, recruitment offers or when the season changes.
Unit Overview (F1)
The F1 key opens the Unit Overview list. The overview lists all commanders and the units under their command by type. The Action Points that commanders and their units have left are also displayed.
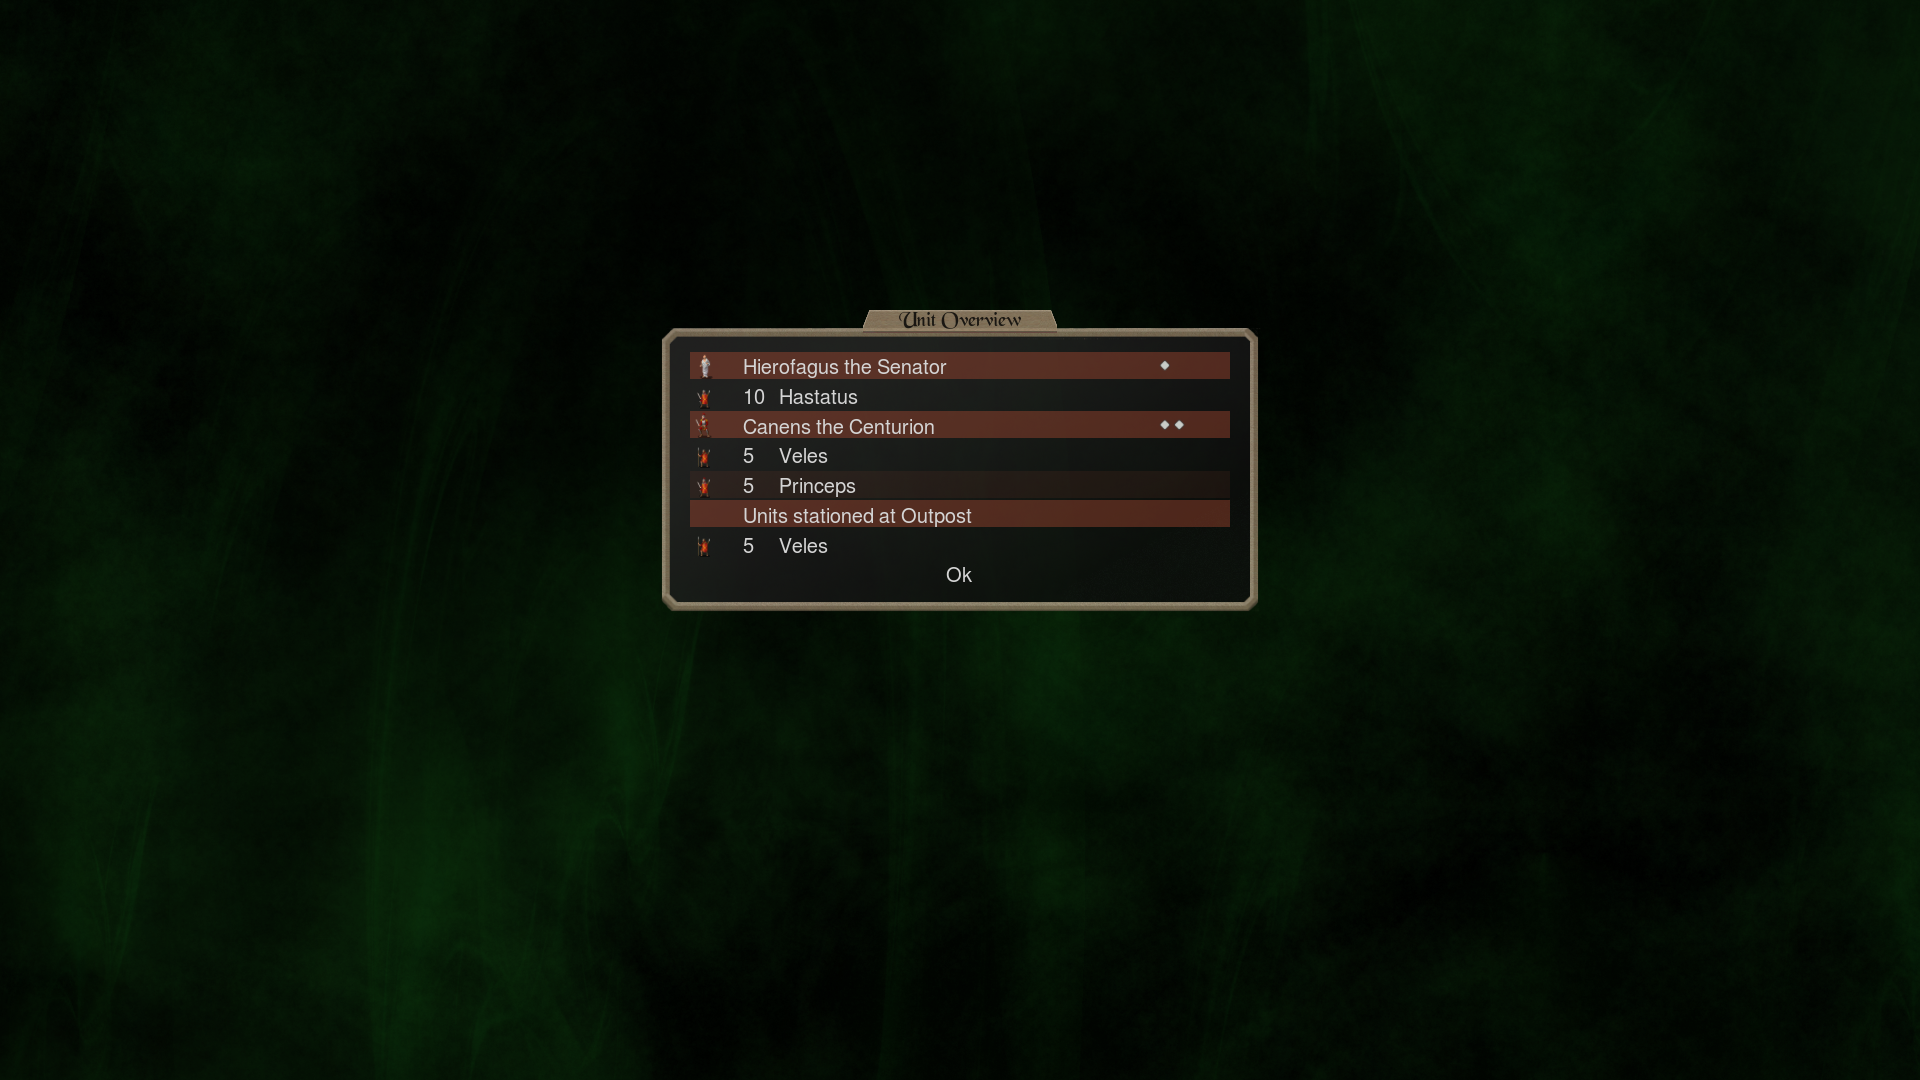
Commanders in sentry mode are grayed out in the list. Left-clicking on a commander set to sentry activates the commander and cancels sentry mode. Insane commanders are shown in light red. After the commanders and their armies are listed, units stationed in various map locations (forests, farms, cities, villages etc.) are displayed. The garrison units are listed starting from the north of the map and moving southwards.
Left-clicking on a commander or units centers the map on the square they are located in and makes the commander active. Right-clicking on a commander displays commander stats. Right-clicking on a unit type displays the stats of one of the units in the stack. For more information on commanders and units, see Chapter Commanders and Chapter Units.
Player Overview (F2)
The F2 key opens the Player Overview screen. The overview lists all players by color and name. Computer controlled players are marked with the notation AI controlled. Eliminated players are marked as Eliminated.
Character Class Description (F3)
This link opens the description of the character class of the player. See Chapter Classes for the actual descriptions.
Score Graphs (F5)
If the game was started with score graphs enabled this button can be used to open the score graph screen. If score graphs are not enabled, they cannot be viewed until the end of the game.
On the top row of the score graph screen there are the symbols for the various resources as well as the player colors. Click on a player color to select or deselect a player whose graphs to view. All players are selected for viewing by default. Deselected player colors are faded out. Click on a resource symbol to view the income for that resource.
File Menu (F10 / F11 / F12)
The F10 – F12 keys open the File Menu. Exit the menu by clicking Ok or pressing Esc. Here you can change preferences, resign or save and quit the game.
Keyboard Shortcuts
The keyboard shortcuts for the various screens are listed here. They are also listed in their respective sections. Combat Screen shortcuts are listed in Chapter Controls. You can always view the available keyboard shortcuts from within the game by pressing ‘?’. This will display the keyboard shortcut for the screen you are currently in.
Movement
You can move one square on the map by pressing q,w,e / a,s,d / z,x,c. Pressing shift + a movement key will give information on the adjacent square in that direction. The s key in the middle is not used for movement, but will instead sentry the active commander. If you have a Number Pad on your computer, the NumPad keys can be used for movement instead of these keys.
Map View & Zoom
Map keys are used to move the player’s view around the Map Screen. Hold down shift as well to increase the speed. Ctrl + up/down can also be used to zoom in and out.
Arrow keys            Scroll map
Page Up               Zoom in (also mouse wheel)
Page Down             Zoom out (also mouse wheel)
Home                  Center map on home citadel
<                     Up one plane
>                     Down one plane
Map Screen
The keyboard shortcuts available from the main interface (Map Screen) are the following.
?                   List keyboard shortcuts
r                   Recruit
long right click    Recruit at specific location
y                   End turn
m                   View messages
n                   Next commander
j                   Previous commander
Space               Commander is done for this turn
t                   Transfer troops
p                   Use commander's special power
F1                  Unit overview
F2                  Player overview
F3                  Class description
F5                  View score graphs (if enabled)
F6                  View active mods
F10                 Settings, save, quit
i                   Square terrain info
v                   View commander stats
l                   Trade administration
s                   Sentry commander
o                   Use location's special power
b                   Burn forest screen
B                   Burn forest immediately
h                   Hunt for slaves
u                   Plane shift
,                   Continue moving
.                   Continue moving for all commanders
ctrl + i            Detailed square info (for modding)
ctrl + a            Astrology reading (for High Cultist)
alt + s             Scry (for Augur)
Home                Center map on starting citadel
Tab                 Hide map icons
Page Up/Down        Zoom in/out
Arrow Keys          Scroll map
qweadzxc            Move commander
QWEADZXCS           Get info on adjacent square
The World Map
Beginning the Game
The main view of the game is the Map Screen, or the world map. At the start of the game the world map is centered on the player’s home citadel. In addition to the home citadel, the player often controls some other structure or terrain, which provides some needed gold, iron or special resources.
Visibility and Exploration
Surrounding the home citadel is the visible, explored area. Outside the explored area is the dark, unexplored area, the shroud. The shroud is removed from a square whenever a commander moves to a square adjacent to the shroud.
Once the shroud has been removed from an area of the map, that area will either be fully visible or covered by the Fog of War (FoW). Areas covered by the fog are visible, but slightly darkened as if under a shadow. The player cannot see any units moving in the fog, whether independents or other players. Only squares adjacent to armies or resources owned by the player or an allied player are fully visible. Everything else is covered by the fog of war. However forests, swamps and similar terrains will not remove the fog of war in adjacent squares.
Squares owned by a player will be bracketed at the corners with the player’s color. Moving into a square switches ownership of the square to the player who moved into it (also known as flagging a square). If the square produces a resource that the player can gather or can otherwise be owned long term, it will stay in the player’s possession until conquered by another player (including independent monsters). When a square owned by a player is conquered by another player or an independent army, a large minus sign will be displayed over it during the next turn.
Armies appear as a colored token (square) displaying the most important unit in the army. Hold down the TAB key to hide armies on the world map and show only terrain.
Seasons & Snow
Each game turn is one month long. As the game progresses, the seasons change and can help or hinder the conquest by affecting the speed of armies and the availability of resources. The game begins in the season of Mid Summer.
Snowy terrain makes movement slower and more difficult, but frozen rivers and lakes can be crossed. In addition to snowy terrain, the seasons can also affect resource gathering. Snowy terrain extends somewhat further south from the tundra in spring and autumn and covers everything except the south during winter. Cold temperature and seasons affects the following resources:
Gold          -50%
Fungi         -50%
Herbs         -50%
Weed          -50%
|
Note
|
Mines are unaffected by cold temperature |
Summer        Herbs +100%
Autumn        Fungi +100%
|
Note
|
The income of iron, gems, sacrifices, relics, lifeforce and hands of glory is unaffected by both seasons and temperature. |
Map Structures
The world map contains many different terrains and structures that the player can move through and/or conquer to add to their domain. Farms, villages, towns, cities, castles, mines and more are there for the taking, though often defended fiercely by their original Independent inhabitants. Different player classes have different needs on what to conquer, so some of them seek areas that are useless for others.
Moving the mouse pointer over a square brings a terrain information popup to the bottom edge of the screen. The popup lists the properties of the terrain or structure. In general, map structures provide resources of some kind or another. The following list can be considered a rough, incomplete guideline:
Gold                      Population centers, mines, larger citadels
Iron                      Mines, some citadels
Gems                      Mines, gem deposits, some special locations
Herbs                     Jungles, Forests and Swamps
Fungi                     Swamps, Forests and Jungles
Sacrifices                Population centers
Hands of Glory            Major population centers, graveyards
Relics                    Temples, major population centers
Weed                      Hoburg Villages, Ancient Forests
Other map structures may provide special powers such as scrying or other functions that an active commander can use. On the world map you can press ‘i’ while holding the mouse over a square to view detailed info on that terrain, including all the resources that it can give you. Map structures may possess some of the following special attributes:
Fortification
Fortification provides an armor bonus of 3x fortification level to any units standing on the walls during battles. Units standing on the walls also have the range of their ranged weapons increased by +1 or +2 for high walls (two squares of wall before the battlements) (icon: tower shield)
Citadel
Citadel structures are castles or other structures that can be used as the headquarters for running an empire. Recruiting troops and commanders is only possible in citadels and losing all your citadels in Elysium means defeat.
The planes closest to Elysium (Sky and Agartha) also count as Elysium regarding this and you will not be defeated by losing citadels as long as you have at least one left here. However, owning a citadel in Inferno will not help against being defeated this way.
Note that some classes can use certain structures as citadels that are not available for that function for other classes. (icon: crown)
Trade Points
Trade Points allow a player to trade gold, iron or special resources. Towns, Ports and Cities provide trade points. See section Trade Administration (l) for more information. (icon: cart full of trade goods)
Vision
Vision allows the player controlling the location to see 2 squares around the structure instead of just 1. The structure must be occupied by the player’s troops. (icon: eye in a pyramid)
Siegable Location
Siegable squares have structures designed to be defended against attack (Guard Towers, Castles, Cities and Towns that have walls etc.). Battles in this square allow siege engines on both sides to fire for 15 rounds before the battle begins. Some siege engines such as catapults can only attack during the siege phase of the battle. (icon: catapult)
Port
Ships are able to enter port squares. Many classes are also able to build ships in port squares that are also Citadels. (icon: anchor)
Library
Library structures allow spellcaster commanders to learn new spells and possibly advance their power through mastery.
All libraries have a level. City libraries are level 1, magic libraries level 2 and some rare locations are level 3. All mages can learn new spells in a library, but the new spell will always be of the library’s level or lower.
It takes gold and AP to learn a new spell. Libraries do not run out of spells, but there are limits to how many spells there are in different disciplines.
Many, but not all, mages can visit a library of higher level than their own to master their art.
|
Tip
|
A Pyromancer (level 2) must visit one of the very rare level 3 libraries to become an Adept of Pyriphlegeton (level 3). A Court Mage (level 1) would only need a standard level 2 magic library to become a Magus (level 2). |
Libraries increase the owning player’s chance to receive recruitment offers from wizards, and possession of at least one library is a prerequisite for receiving wizard offers for most classes. The number of libraries owned is shown as an icon of stacked books in the recruitment screen. The popup for this icon will tell you what recruitment offers will become more likely from owning magic libraries.
Temple
Temples usually increase the owning player’s chance to receive recruitment offers from shamans and priests. Temples may or may not be guarded. The number of temples owned is shown as an icon of a cathedral in the recruitment screen. The popup for this icon will tell you what recruitment offers will become more likely from owning temples.
Monster Lair
Monster Lair structures spawn wandering stacks of independent monsters to roam around the map. The independent stacks are quite aggressive and will often attack player troops and even large armies. Conquering a monster lair and flagging it will cause the square to stop spawning monsters. Note that it must be flagged for the spawning to stop.
If the monster lair is reconquered by independents, it will resume spawning wandering monsters, so garrisoning a flagged lair is advisable. If the lair is conquered and stops spawning the Monster Lair icon will be greyed out. (icon: tent)
Some of the most common monster lairs are:
-
Ancient Forests, which give birth to wandering stacks of forest animals. Ancient Forests are almost always guarded. They cannot be flagged unless the player can gather herbs or fungi, use them as citadels or perform a suitable ritual. Occupying an Ancient Forest without flagging it will not stop it from spawning animals, which will then appear in adjacent squares. Provides Herbs, Fungi and Weed.
-
Guard Towers, are well defended outposts of human civilization. They spawn guard squads that will attack animals as well as brigands and players. Guard Towers can be used as citadels and can be flagged by everyone.
-
Brigand Lairs, which spawn roving bands of brigands led by scouts. Brigands and scouts are stealthy and extremely aggressive and can be a nasty surprise for the unwary. Brigand lairs are often guarded, but if not, the inhabitants are probably somewhere close by. Brigand Lairs can be flagged by everyone. Provides Hands of Glory.
-
Graveyards, which spawn bands of lesser undead to menace everything in sight. Graveyards are almost always guarded. Usually the guards are lesser undead, but it is not uncommon to find one or more of the far more dangerous greater undead guarding them. Graveyards can be flagged by everyone. Provides Hands of Glory.
-
Haunted Cities, which give rise to bands of undead and horrors from the Void. Haunted cities are always guarded and can be flagged by everyone. Provides Hands of Glory.
-
Pirate Ports, which spawn pirate ships as well as land bound roving bands of brigands. Pirate Ports are always guarded and can be used as citadels.
-
Giant Ant Hills, which spawn giant ants in large numbers. The ants are very dangerous, but their lair can be tagged by anyone to stop them from spawning. Scourge Lords that take control over a Giant Ant Hill will corrupt it and have it produce Scourge Ants.
Converts of El
Farms, settlements and other locations with a white cross on the tile indicate that the square has been converted to the worship of El. One third of the gold income for that square is always diverted to the coffers of the Church of El. Squares owned by the Celestial faction are exempt from paying to the Church of El.
Independent Monsters
When a new game is created, the map is populated with independent monsters. Some of them will be guarding map features like mines and will not move. Others are randomly distributed in unpopulated squares. These independents will move around the map and may attack players or independents from other factions.
Different independent monsters have different preferences that determine where they like to wander, e.g. deer & moose like to keep close to forests, brigands are likely to raid settlements and dwarves will wander around until they find a nice mine to settle in.
Most independents in Elysium belong to the standard independent faction with a grey colored tile, but there are others as well. These different factions will fight with each other if they enter the same square.
Spawning of new independents can only occur on special tiles when they are not player owned, or by special monsters that have the ability to reproduce or spawn other units. New units will never appear for no reason, but sometimes it might look like that, as certain events might enable some units to move between planes, making them appear in an otherwise peaceful area.
|
Tip
|
Ancient Forests will spawn random animals if they are not owned by a player. |
|
Tip
|
Independent Dvalas (dwarf queens) sitting in mines will give birth to new dwarves and send out dwarf patrols now and again. |
|
Tip
|
Independent Kobolds sitting in mines will reproduce and send out new kobold armies occasionally. |
Normal independent units are shown on grey tiles.
The Empire / The Kingdom
The Empire or the Kingdom is the faction that currently rules Elysium and it is responsible for keeping the order and fighting off animal attacks. It consists of mostly Human and Hoburgher troops and they are usually well armed.
This faction spawn new troops from guard towers whenever they are not owned by any player or another independent faction.
Units belonging to this faction have grey-blueish tiles.
Inferno
The Infernal forces consist of Devils, Demons, Sinners and other beings that are found on the Infernal plane. The infernal forces thrive on sinners and if possible they will try to gather sinners from Elysium and bring them back to Inferno.
If any Devil or Demon commander brings back a group of sinners to a citadel in Inferno, they can convert the sinners into new demonic forces. 40 sinners are required to get a new group led by a Greater Devil or Demon. 10 sinners is enough for a small group led by a low ranking devil or demon.
In Elysium the infernal forces can use sinners to repair destroyed gates. 99 sinners are required to fully restore a destroyed gateway.
Infernal units are shown on grey-reddish tiles.
Hades
The forces of Hades consist of the spirits of the dead and other undead beings that reside on the plane of Hades. These beings feel a strange desire to attack any living beings that they encounter.
Every sentient being that is slain in Elysium will find its soul transported to Hades and there it will live on as a dispossessed spirit. If it is lucky it might find itself upgraded to a higher ranking undead being through some special event.
Special events might sometimes enable dispossessed spirits to cross the worlds and enter Elysium. If this happens, locations where huge battles have occurred are likely to become very dangerous.
Hades units are shown on green-greyish tiles.
Celestial
The forces of heaven consist of Angels, Heavenly Beasts and Saints.
The Celestial forces are prevented from entering Elysium by seven powerful seals. Better not break those seals, they were probably put there for a reason.
The Celestial forces are shown on grey-yellowish tiles.
Horrors
Horror units are shown on a grey-purplish tile.
Horrors usually reside in the vastness of the void. But sometimes they might be able to find points of entry into Elysium and enter through those. These points are usually some kind of power node that has been built in Elysium, like pyramids, huge marble spheres and similar structures.
Horrors like to cause suffering to all sentient beings. Usually they will kill their targets, but sometimes they will mark it instead and come back later. Being horror marked like this is an unpleasant experience, as it means that some horror is likely to drop by at a later time.
There is no way to get rid of a horror mark, short of dying.
The Planes
Elysium is a mystical world of secrets and a nexus of many channels of power. Beyond the barriers of movement or the senses there are other worlds, other planes of existence that interact with Elysium. This is an overview of those places.
Once another plane has been glimpsed or visited, its known locations can be viewed by selecting the plane from the menu bar at the top of the main Map Screen. Before a specific plane has been viewed or visited, the selection button for that plane is grayed out and inaccessible.
Celestial Plane
The abode of angels and celestial powers is unattainable to mere mortals. However, the priests of El claim that those who die free of sin will be brought here to live in eternal bliss. According to old prophecies a war between the angelic and infernal forces will one day take place in Elysium. Should infernal forces find their way into Elysium a heavenly gate will open and angels will enter Elysium and the righteous will be able to flee into Heaven.
Sky
Far above the surface of Elysium is the sky. Here the clouds are thriving, new clouds are formed all the time while the old clouds drift away and slowly dissolve. The sky is also the home of mystical air beings of various kinds and some have even formed cities and citadels among the clouds.
The Sky is not far away enough from Elysium to be an actual plane and the planar immortality ability regards the Sky, Elysium and Agartha as being the same plane. Not being that far away, the sky is influenced by Elysium and the dry deserts in Elysium will prevent the forming of clouds above them.
Elysium
Elysium is the principal world where all the player factions in the game vie for power, it is also here that most, but not all classes have their home. Elysium is full of riches and anyone, even those that need very exotic resources are likely to prosper if they are successful in the Conquest of Elysium.
Agartha
Under the surface of Elysium lies a vast cavernous realm. This is Agartha, rich in gold and gems. Here dwell the deep ones, blind olms and strange cave cows. While these caverns are vast, they are not all connected and most of them don’t have any means of access. Some burrowing monstrosities might be able to dig tunnels to connect the caverns, but for the most part Agartha is inaccessible to all but the Elemental Kings of Earth and their servants.
Agartha is said to lie between Elysium and Inferno, where demons dwell. While most scholars reject the idea, there are those who claim that it would be possible to dig down into the infernal realm to liberate sinners from eternal torment. If this would be morally acceptable is a popular discussion in some magic academies. More so than the discussion on how to embark on such an endeavor.
Inferno
Inferno is the realm of the Demon Lords, beings of godlike powers. Here sinners are tortured and forced to work in endless mines and ashen fields.
There are four regions in Inferno. One is the fiery realm from which the entire plane has been named. On the opposite side of the plane lies Kokytos, an icy realm where sinners are half buried in ice and snow. Between them lies the ashen fields of Pandemonium, where constant war is waged between the dukes and lords of hell. Here lies the capital of Belial, Lord of corruption. The entire plane is surrounded by the Abyss, dark chasms and caverns inhabited by sun-fearing demons, shades and fiends of darkness. Somewhere in the perpetual darkness lies the dark abode of the Arch Devil Abbadon.
Hades
Hades, the Underworld, is the realm of the dead. It is a pale and dark reflection of Elysium with towns, forests and castles, only distorted, dark and fearsome. The spirits of those who have died will cross the veil separating Hades from Elysium and find themselves bound to live out their last days for eternity. Somewhere in Hades lies the Citadel of the Dead, where Orcus reigns supreme.
Skilled Necromancers have mastered the means to travel the stygian paths of Hades to move great distances. Hades is the realm of the dead and is detrimental to all living beings. Each month a living being staying in Hades, it will suffer some damage that can’t be healed until it leaves the Underworld.
Aztlan
Aztlan is the mythical home of the Aztlan demon gods. In the heavenly serpent lies six realms, each ruled by a dark and hungry god. The Aztlani claim that they return to one of these realms when they die, to live in their afterlife according to their conduct in life. The six realms are connected and it is said that the celestial serpent swallows the sky and that its tail reaches all the way down to other even darker realms.
Primal World
At the Dawn of Time, Elysium was part of what is called the Primal World. This was a time when the barriers between worlds were thin and there was no clear distinction between planes. During this time animals, monsters, giants and demons roamed the lands.
But by some unknown force, or a divine decree, the worlds were suddenly separated and anchored in Time. Demons were imprisoned in the depths of Inferno and the dead were forbidden to walk among the living, banished forever to the Underworld. The Primal Plane from whence all beasts come, was set apart and only there were animals and monsters allowed to grow in size and power.
But not all inhabitants of the Primal Plane are animals. When mankind arrived in Elysium and the Planar Gates begun to close, the first men of Elysium, the Sidhe and the Tuatha, left for the Land of the Ever-Young beyond the gates, never to be seen again.
Being in the primal world has a mystic effect on animals and they will become larger, stronger and more intelligent if they are there long enough. This effect is permanent and the animal will not diminish in power if they leave again.
Elemental Planes
The Elemental Planes of Air, Earth, Fire and Water form a single realm of power, unified in its role as the home of primal elemental energies and forever divided against itself in an eternal war for dominance between its four parts. The Elemental Planes are ruled by the Kings of Earth and Fire and the Queens of Air and Water.
Separating the Elemental Realms is the Nexus, a site of tremendous magical knowledge and power. It is said that the Nexus was created by the powerful warlocks aided by beings from another world. The purpose of the Nexus was probably to channel power from the elemental planes into unimaginably powerful rituals. However, some say they were tricked into creating it by the strange beings in an attempt to destroy the world. The Elemental Planes are both difficult to reach and perilous in the extreme, the Nexus even more so.
Void
The Void is a vast emptiness that does not resemble anything. In the rare cases that something can be seen in the void, it is fleeting in time and made up of strange geometry that is impossible to understand. Just being in this place will drive any sane being into insanity.
But the void is not uninhabited, horrors and other strange beings that are mostly unknown to Elysium thrive in the void and if we are lucky they will never enter Elysium. Care has to be taken, as certain buildings designed to manipulate the power of the void, e.g. pyramids, have been known to close the gap and enable void creatures to enter Elysium.
Recruitment
The Recruit Units menu allows the recruitment of units whose services can be bought for a price in gold. Buying better equipped or more durable units or specialist units might also require iron or other more exotic resources in addition to gold. Recruited units do not cost any further upkeep after they have been bought.
Long right click on the map square you want to recruit in to open up this menu.
All units available for recruitment may be examined by right-clicking, but possible spells or magic items will not be shown until they have been recruited. However it is well known that Wizards and Heroes often have magic items in their possession.
Auto Recruitment
You can enable auto recruitment of units by holding down Control and clicking on a unit. A green dot will appear to indicate that auto recruitment is enabled for that unit type. At the end of each turn that unit type will be recruited if it is possible. If multiple units are enabled for auto recruitment at a single location, a random one will be recruited each turn.
Mercenary offers and commanders can also be set to auto recruit. If set to auto recruit they will always be bought when an recruitment offer and enough resources are available.
Recruitment Locations
Recruitment may be done in any citadel owned by the player. Select the desired citadel from the top of the menu.
Right-click on a citadel in the list to center the map on it. It is also possible to directly select something other than the home citadel by pressing and holding down the right mouse button over a citadel on the world map until the recruitment menu opens. This long right click is the best way to recruit where you want when you have got more than just a few citadels to choose from. Troops cannot be recruited in the citadels of an allied player.
Basic Recruitment
Each class has a basic recruitment list that is available at all times. All basic recruitment units appear in black text. You can recruit one group of basic units in each citadel per turn.
Special Offers
In addition to the basic recruitment list, other, normally unavailable units may appear for special recruitment from turn to turn. The availability of such units usually generates a Recruitment offer message at the beginning of the turn.
Special recruitment offers must be acted on immediately. They will no longer be available for recruitment on the next turn. The price of special offers may vary widely and some of them are very expensive. Hoarding gold for special recruitment may therefore be advisable.
Units that appear in green text are called mercenaries and can only be recruited once per offer, however they will not prevent other units from being recruited in that same citadel on the same turn. Commanders are also shown as green or blue text, meaning that they also can only be recruited once and will not prevent recruitment of other troops.
Commanders who appear in blue text are capable of gathering a special resource, meaning they are probably extra important. Their recruitment works just like commanders with the green text.
Special Locations
Some locations offer special units that can only be recruited at that location. One of the most common ones is the Castle. In the Castle Catapults and Heavy Infantries can be recruited, even for classes that usually cannot recruit those units.
However some classes like the Dryad Queen and the Kobold King are unable to take advantage of the human-like recruitment offers at special locations. Other classes like the Dwarf Queen must pay extra to use them.
Other locations with special recruitment are the Desert Palace, the Old Castle, the Citadels found in the Sky and citadels on foreign planes.
Dwarf Queen Recruitment
The Dwarf Queen class has a recruitment system that differs from all the other classes. Each Dwarf Queen, or Dvala, produces one or more Dwarf Workers per month.
Dwarf Workers can be converted to more powerful and specialized dwarves by spending iron and sometimes a little gold. Usually the conversion is done in batches of 5 workers. Partial batches can be converted if you have less than 5 dwarf workers, but the price will be the same as for 5, so it is not recommended.
Thus the Dwarf Queen’s recruitment is restricted not by the available gold but by the number of workers present at the recruitment location and the amount of iron in the treasury. The Dwarf Queen is also the only class that can gain commanders through normal recruitment, but even she is restricted to one Dwarf Commander per turn regardless of how many citadels she has.
Dwarven Rune Smiths can convert the upgraded dwarves to different types of magically equipped elite dwarves by using gems.
Temples, Libraries and Towns
Owning Temples, Libraries and Towns usually increase the chance of receiving recruitment offers from priests, wizards and Mercenaries. The number of special buildings owned as well as what bonus it results in is shown in the recruitment screen. The player must possess one or more libraries, temples or towns in order to see these icons in the recruitment screen.
The bonus for each structure is small and varies both by class and by the type of commander. For example, the bonus to recruit an Old Wizard is less than the bonus to recruit a Pyromancer and these bonuses may be greater for one class than for another. E.g. A Witch receives an increased chance to recruit apprentices from temples and increased chance to recruit wizards from libraries. A Necromancer receives an increased chance to recruit both apprentices and wizards from libraries, but no effect from temples.
The town points gives an increased chance of receiving offers from mercenaries and also more offers from merchants willing to sell magic items.
Commanders
Commanders are units that can be moved around the map and are required to lead armies. Non-commander units cannot move on their own. Managing commanders correctly is crucial to succeeding in the conquest of the land. This section gives an overview of commanders and what they can and cannot do.
Commander List
On the upper left corner of the world map view are one or more commander tiles, if a square containing commanders has been selected. When a square containing only one commander is selected, that commander is automatically selected as the active commander. When a square containing multiple commanders is selected, the first one in the list is automatically selected as the active commander.
Clicking a different commander makes him the active commander. Commanders may be selected individually or grouped together. Ctrl-click allows adding commanders to a group with the active commander or removing them from the group.
The background of each commander tile gives information on the commander in question. The background of the selected (active) commander is highlighted in white. If multiple commanders are grouped together, the active commander’s name appears in black and the names of the others in the group are grayed out. Black background means a commander set to sentry status and must be manually selected to activate him again. Pink background (or red, if not active) means the commander is suffering from insanity and refuses to accept any orders during the current turn.
Acquiring Commanders
Each player (except the Troll King) starts with two commanders: The main class player character and an apprentice or other type of lesser follower. There are different ways of acquiring more commanders: Random events (very rare), special recruitment, magical summons and charm spells.
Renaming Commanders
By default this is impossible. But if Conquest of Elysium is started with the command line option --rename (see Chapter Command Line Options for more information), it is possible to rename most commanders by viewing their statistics and pressing the n key. The main commander and some other special commanders cannot be renamed.
Leadership
A commander is not automatically a leader. Most commanders can lead troops, but some of them cannot. Commanders who cannot lead troops often have special abilities that benefit the entire army if that commander is with them. Some commanders are fighting heroes or spellcasters, but they act as individual warriors and mages, not leaders of soldiers and thus others must lead the rank and file troops. Leaders with troops under their command have a sword icon on their commander tile. Non-leader commanders have a red X.
Action Points
All units in the game have Action Points (AP), which determine how much or little they can do on a given turn. Action Points are used for everything from movement to magic rituals or using the special powers of a map structure. A normal unit has 3 AP. A slow unit has 2 AP and a fast unit has 4 AP. Slow (icon: snail) and Fast (icon: moose) as unit special abilities only have meaning on the world map and in relation to Action Points. They have no effect in combat.
The Action Points available to a commander are shown on the commander tile as diamonds. Light gray means AP available for actions. Dark gray means that the commander has not used up that AP, but he is leading troops who have already used some AP or are slower than him and cannot move anymore that turn. The dark gray AP can be used for other things such as special powers, though. Black diamonds denote used AP
Group slow units with a slow commander and fast units with a fast commander to get the maximum benefit out of the available AP. Transferring units from a commander who has already moved to a commander who hasn’t restricts the second commander by the amount of AP the transferred units have already used up. Some non-movement actions may require more AP than a commander has, in which case the commander may perform that action if he has at least one AP left, the AP that go over the limit will be deducted from their AP allowance the next turn.
Orders
The Orders dialogue box appears on the upper right corner of the world map whenever a commander is selected. The following (and other) commands may appear in the Orders box:
-
Sentry (s)
-
Transfer Units (t)
-
Use Special Power (p)
-
Use Location’s Special Power (o)
-
Burn Forest (b)
-
Hunt for Slaves (h)
Sentry sets the selected commander to sentry mode, removing him from the list of commanders selected by choosing next commander (n). Commanders in sentry mode also lose their colored background, making them less visible on the world map. To remove a commander from sentry mode, select him manually from the map or from the Unit Overview (F1) screen. Note that setting an active commander to sentry when he is grouped with other commanders sets ALL of the grouped commanders to sentry mode.
Transfer Units opens up the unit transfer screen. This order does not appear for commanders who cannot command troops (e.g. Old Weapon Master or Unexpected Hero).
Use Special Power opens up the menu for the special power specific to the commander. This command only appears for the commanders who possess special powers. See section Use Special Power.
Use Location’s Special Power activates the possible special power of the map location the commander is standing in, if it has one.
Burn Forest is a command available to armies with Pyromancers or Warlocks of Fire, some fire breathing units or commanders who carry some suitable magic item and units who know certain fire spells (e.g. Combustion). The burn forest command requires one AP and sets the forest on fire.
Forest fires can also spread to adjacent forest squares. Burning a forest transforms it to a dead forest once the fire has burned out. Forests cannot be burned in winter. Any army that contains units possessing the Fire Aura special ability at a strength of 5 or more will automatically set a forest or jungle on fire upon entering the square.
Hunt for Slaves is a command available to Priest King and Tribal King commanders of the Priest King class. The command requires 3 Action Points and summons a number of Slaves (very weak infantry units). The command can only be performed in a settlement the size of a hamlet or larger.
Done With Orders
If you have no orders for a commander for the current turn, but do not wish to have him appear in the next commander selection, press the SPACEBAR key when you have him selected. This will set the commander’s orders as “Done” for the current turn, but the next turn he will be active again like all non-sentry commanders.
Transfer Units
The Transfer Units menu (t) governs army management. It displays the commanders and units in the square and how the units are divided among the commanders. Simply right clicking on an army opens up the Army Screen, which is otherwise similar to the Transfer Units menu, but does not give any information on what units are assigned to which commander.
The active commander is indicated by his flashing token. Other commanders are marked by a triangle at the bottom right of their token. To change the active commander, exit the screen, select the desired commander from the commander list and go back to the transfer screen. Units assigned to the active commander are shown in the player’s color. Units assigned to other commanders have black tiles. Units not assigned to anyone are shown as having transparent tokens.
Unit assignment works in the following manner:
Left-click on a unit to assign it to (or remove it from) the active commander.
Left-click on a unit assigned to a non-active commander to move it from that commander to the active commander.
Double-click on a unit to select/deselect that unit and all identical units (e.g. all spearmen or all archers).
Right-click on a unit to display its stats.
Left-click on a non-active commander to place him under the command of the active commander. The commander is removed from the commander list on the world map and will move with the active commander as if he were a unit in the active commander’s army. Any units assigned to the commander are reassigned to the active commander. Left-click on him again to return him to active status in the commander list. This will not return his previous units to him, however. This is useful for managing multiple commanders, especially when one of them is assigned to permanently provide some kind of benefit for the entire army.
?       List keyboard shortcuts
a       Select/deselect all
b       Select/deselect all units with battle afflictions
c       deselect all units with fewer AP left than the commander
f       Select/deselect all fast units
i       Highlight all units with magic items
l       Deselect all landlubbers
m       Select/deselect all of the type under the mouse pointer (same as double click)
s       Select/deselect all slow units
w       Select/deselect all wounded units
+/-     Select/deselect 10 units of the type under the mouse pointer
arrow keys    Scroll screen
Shift + left click    Select a range of units
Use Special Power
The Use Special Power menu (p) is primarily only available for the player’s main character and his or her possible apprentices or specific commander types. The Use Special Power menu is different for each class. For more specifics, see Chapter Classes.
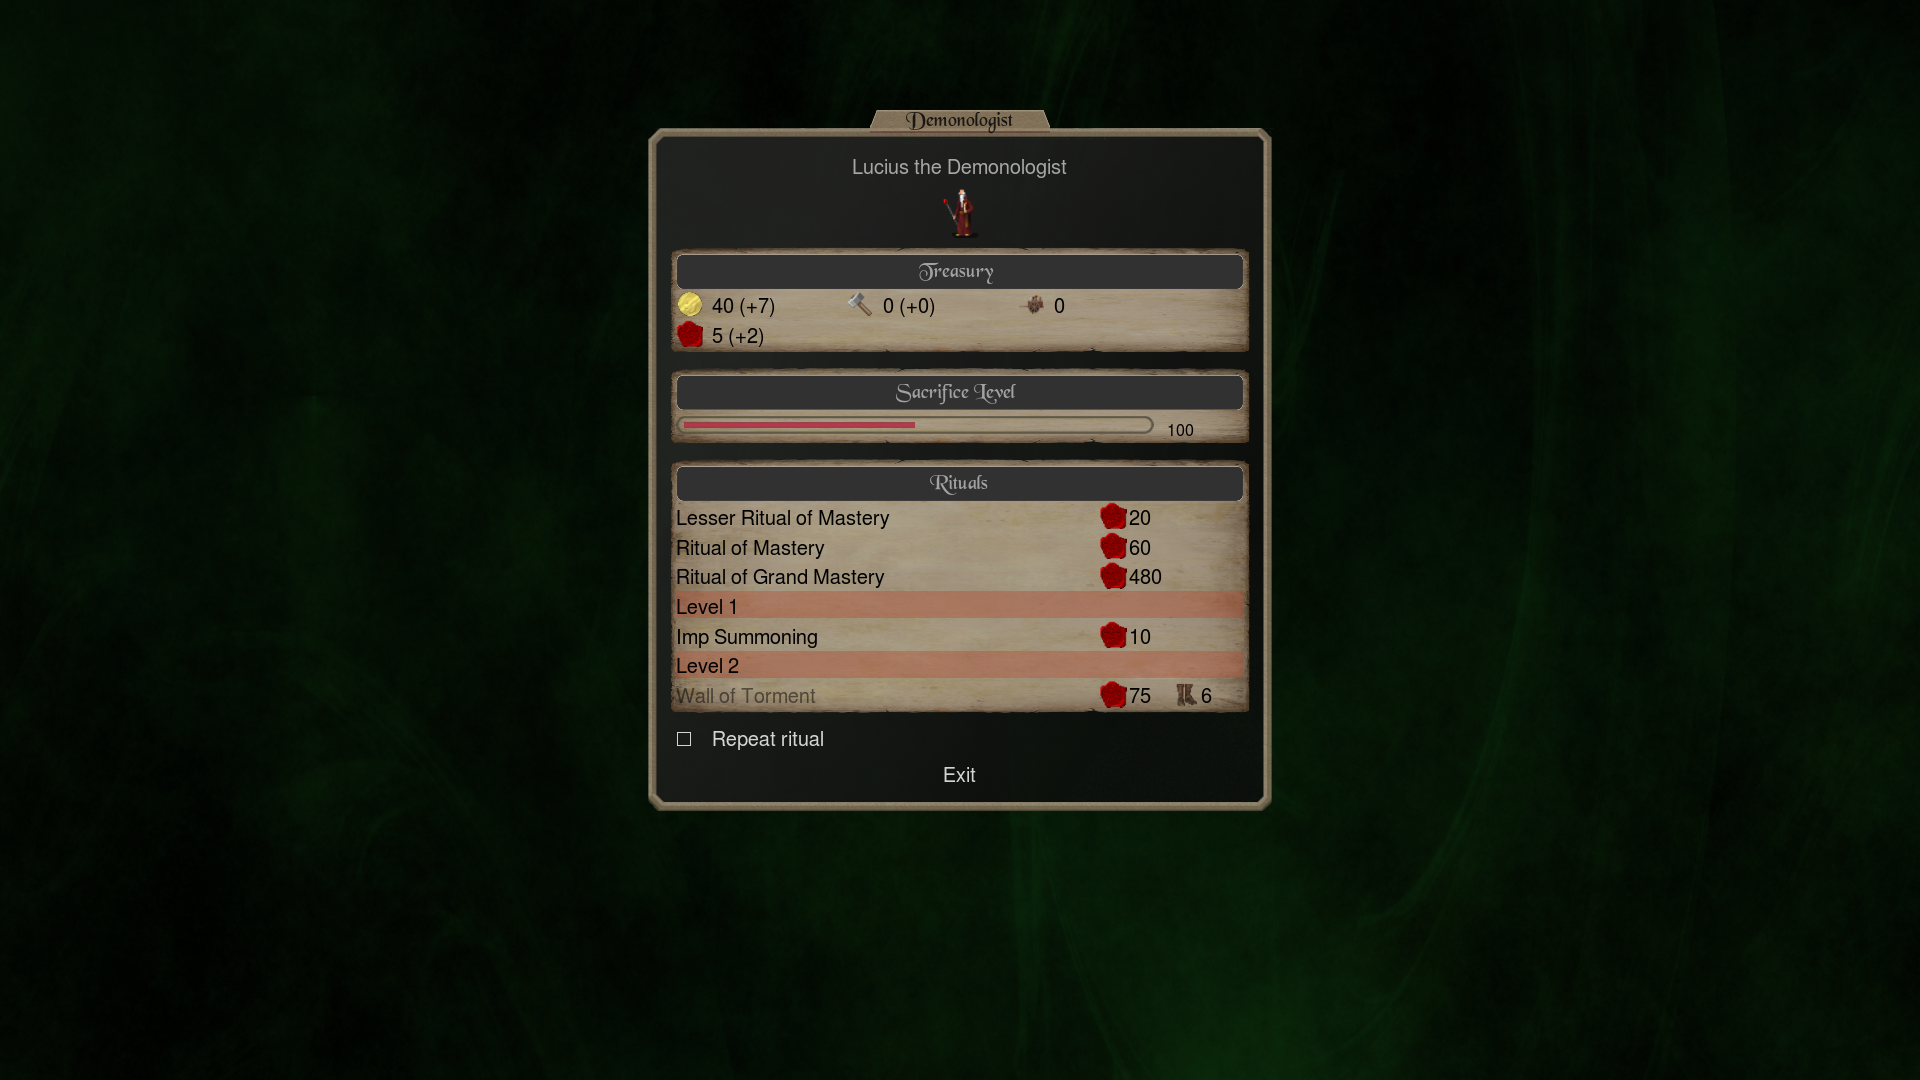
The Treasury section displays current reserves of gold, iron and special resources as well as their monthly growth rate.
Special Options contain possible class specific options on the use of special resources or other arcana. This section varies by class and does not appear for all classes or commanders.
The Rituals section lists the rituals available for that commander. Performing a ritual usually requires 1 Action Point from the commander, but some time consuming rituals require more Action Points. Rituals are usually fueled by the special resource specific to the class. The rituals that do not require a special resource usually have other prerequisites and possible penalties.
Most rituals summon monsters or other allies to serve the player. Rituals of Mastery upgrade the character, making them more powerful and possibly opening up new abilities and spells. Some classes have the option to control how much special resources they are willing to put into the ritual, thereby increasing or decreasing the chances of success. Using less resources may be outright hazardous.
Other rituals or special powers allow for things like upgrading the walls and gates of a fortress, entering other planes of existence or modifying existing map structures.
Some rituals may only be performed in certain map locations, or they may be more effective at certain locations. Performing some rituals may make it impossible for that commander to use other rituals (for example, a Necromancer who turns himself to a Vampire will no longer be able to use the Lichcraft ritual even if knows it).
A commander can also be set to repeat a ritual as long as there are enough resources to cover the cost. This reduces the need to micromanage every commander who is performing minor summonings, for example, or performing other actions that only require few resources or Action Points. A ritual will be removed from repeat if the resources available at the end of the turn would not enable the ritual to be cast again.
Movement
This section covers movement on the world map and the inputs used to give movement orders as well as the limitations of army movement.
Movement Controls
When an active commander is selected, clicking on a map square sets his destination and clicking there again will move him and his army as far as possible along that path. You can also use the numerical keypad to move in a direction without setting any path first.
If the commander was unable to move the entire way to his destination, the path will remain in the next round. Next turn, pressing comma (,) will make him continue on his path. Pressing dot (.) will make all commanders with paths left continue their moves.
Movement Costs
Different terrains cost a different number of AP to move into. Moving to any terrain costs 1 more AP in winter than in other seasons. Rivers and lakes can only be crossed in winter or traversed by Amphibian, Aquatic or Flying units otherwise. Special abilities may reduce movement costs, but they only apply if the entire army possesses that ability or another ability that reduces the cost with at least as much. All units under the same commander pay movement cost according to the slowest unit in the army.
The rule of thumb is that moving to a map structure costs as many AP as moving into the basic terrain of the underlying type (e.g. mines are in mountains or hills, farms on plains etc.).
The popup at the bottom of the map screen will show how many movement points it takes to enter a square, if it takes more than one. This is indicated by the number of boot symbols. One boot equals one AP in movement cost. However the extra cost of moving in snow is not indicated and you have to account for one extra AP cost if the square is snow covered.
Sea Movement
Certain units are amphibious (e.g. Ichtyids and Krakens) and an army consisting of only amphibious units is able to enter the sea just like any other square. Floating and flying units are also able to accompany an army into sea squares, but flying units will get tired from staying over a sea square.
Other units can use ships to traverse the sea if they are small enough to fit. Only units that are normal sized (1 square large) can fit on a ship. One ship is large enough for 20 units, so e.g. 19 spearmen and 1 captain could use a ship to travel onto a sea square.
Every commander that wants to go by boat must either have their own boat or be put under another leader that has a boat. You cannot select multiple commander at once where only one has a boat, and then go out to sea.
Apart from sea squares ships are only able to enter ports. It is still possible to go ashore at any land location by leaving the ship at sea however. To leave the ship and go ashore, deselect the ship in the Transfer Units screen and then go to the land square like a normal move. It is also possible to reboard the ship later on.
Flying
Flying units are very mobile and can enter almost any square for a cost of 1 AP.
Flyers can enter sea and sky squares, but they will get tired if they end their turn on one of those. If they were already tired they will float down gently to the ground instead. The tired status will disappear once the flier ends a turn on solid ground.
It is also possible to rest on a ship for size 1 fliers, regardless of whether the ship is full or not. Floating units will never get tired.
Movement and Insufficient AP
If a commander (and his army) have insufficient AP to move to a terrain, they can still move there, but the missing AP will be deducted from their AP allowance on the next turn(s). Moving to mountains in winter will cause slow units to lose the entire next turn even if they had full AP.
|
Tip
|
A commander has 3 AP and moves one square to a plain, costing 1 AP. He then moves to a mountain, costing 3 AP, but he only has 2 AP left. His army makes the move to the mountain and uses up the remaining 2 AP and he starts his next turn with 1 AP already used up and only 2 AP left. If he has slow units in his army, he will not be able to move at all the next turn, because those units will have used 1 AP out of 2 available before the move and 2 AP will be deducted the next turn.The commander can still use any special abilities even if he cannot move, though. |
Moving an army to a frozen lake or river in the season of Late Winter is dangerous and might cause any non-amphibian units and commanders in the army to drown when the ice melts in Early Spring. In case your commander drowned and you had amphibian units in the army, you can go back and pick them up next winter.
Moving to an Occupied Square
Moving to an occupied square will initiate combat unless the occupying army belongs to an ally. Initiating combat will instantly use up all the APs of an army and its commanders and terminates movement for the turn. Combat is then resolved at the end of turn.
Units
Right-click on a unit in the Army Screen or a commander on the World Map to enter the Unit Screen to view that specific unit’s statistics. Right clicking the various weapons, special abilities, spells etc. will give more information. The top of the unit screen shows the name of the unit. If the unit is a commander, it will show the name of the commander followed by his creature type, e.g. Falco the Captain.
Primary Statistics
Below the unit name are the primary statistics, which are explained below.
- Hit Points (HP)
-
The amount of damage the unit can take before dying. Once Hit Points reach zero, the unit dies.
- Strength (Str)
-
Strength affects the damage the unit does in combat. Strength is also used to resist some special attacks and spells. The typical human has a strength of 4, a troll a strength of 8 and a giant or other large, powerful monster a strength of 10 or more.
- Morale (Mrl)
-
Morale indicates how courageous the unit is in combat. Units with low morale are likely to be easily disheartened and susceptible to fear caused by spells and hideous monsters and may run away from combat as a result. Units with high morale are less likely to do so. Mindless units, lacking the capacity to think or worry about anything, have a morale of 99 and are immune to fear.
- Magic Resistance (MR)
-
MR indicates how likely the unit is to resist a hostile spell or special effect that can be resisted by MR. Average human units have an MR of 4, animals have an average MR of 2 and mages have a typical MR of 5 to 8. Highly magical creatures may have even higher MR.
- Armor
-
Armor subtracts damage from all attacks against the unit. If the attack negates armor, this value is ignored. The amount of damage subtracted is the same as the armor value.
- XP
-
Experience points are an indication of how experienced the unit is. See section Experience for more information.
- Rank
-
Front, mid or back. See section Rank for more information on what the placement rank means and how it functions.
- Kills
-
The number of enemies the unit has slain.
Item slots
Most units have at least some item slots where they can carry magic items. There are several types of item slots.
-
Magic weapon
-
Magic helmet
-
Magic body armor
-
Magic gauntlets
-
Magic boots
-
Magic miscellaneous items
Magic items on a unit are shown as small icons after the primary stats. The item’s effects are added to the stats, magic and abilities of the unit. Applicable weapons (those wielded in the hands, e.g. broadsword) are replaced.
Any unit may use a magic item if it has the correct item slot. Human sized humanoid beings have all item slots. Cavalry units do not have a boot slot. Giant sized humanoids have a weapon and two misc item slots. Most other monsters only have two misc slots. Basic elementals have no item slots.
Some items have an activated power that can be used, but in this instance the unit using the item must be a commander. If the commander cannot use the activated power and tries to do so, there will be a message to that effect (e.g. a non-mage trying to use a spell scroll item).
Items can be transferred from unit to unit by clicking on the item slot where the item is located. This opens the Army Screen, where clicking on the target unit transfers the item to that unit. If the target unit does not have the appropriate item slot or the target’s applicable item slots are full, the item will stay with the current owner and the transfer fails without an error message.
If the bearer of an item dies in combat, surviving commanders pick up the items. If there are no commanders left or their item slots are full, surviving units pick the item up if they have the slots. Items are lost only if there are no units capable of picking them up after the bearer dies.
Weapons
The weapons of a unit are listed after the primary statistics. Some units may have the same weapon more than once, indicating that they are skilled enough to make multiple attacks in one round with the same weapon. Barbarian Leaders and High Lords are examples of such units.
Weapon Types
There are several weapon types. See Chapter Weapons Damage and Death for more detailed information on weapons and damage. Usually weapons with range 1 are melee weapons that can only be used in melee and those with longer range are missile weapons that cannot be used in melee. Spells only have a small chance of being used if the caster is engaged in melee combat. If a spell is cast no other type of attacks will be done that round. However sometimes the attack name is followed by a special marker (e.g. two stars or a hashtag) that indicates that it can be used in other circumstances than usual.
Weapons & Magic Items
Some magic items are weapons and grant the unit wielding the weapon a new one to replace the weapon they would normally have. For example, giving a spearman a Sword of Heroes will replace his normal Spear (1d5 piercing damage) with a Magic Sword (1d10 slashing damage). Many units have natural weapons like claws and bite, which cannot be replaced. Usually the only weapons which can be replaced by a weapon from a magic item are weapons that could be wielded by hand. Most units who do not have such weapons do not have an item slot for weapons either.
Spellcasting
Both commanders and normal units may have spellcasting skills in some path of magic. There are a total of almost 100 different disciplines of magic with a wide variety of spells. Magic skills are listed by discipline below the weapons.
Spellcasting Behavior
Spells act like weapons in combat and their effects usually only last the duration of the battle unless they cause permanent effects (e.g. disease). For the specific effects of a spell, right click on it to view more detailed information. The primary weapon of spellcasters is Cast Spell level x, which allows them to cast spells of that level or lower. A rare few mages may have more than one Cast Spell weapon. A mage of higher mastery level than the spell level casts an additional spell in his turn. A lvl 3 mage may cast 1 level 3 spell, 2 level 2 spells or 3 level 1 spells. Any time a mage casts multiple spells per round, it is always the same spell.
Spell Memorization
A spellcaster can only keep a certain number of spells memorized simultaneously even if he knows many more. Only memorized spells can be cast in combat. If fewer spells than the maximum are memorized, random spells from the caster’s spellbook will be memorized to fill up the empty slots when the player exits the Unit Screen. If more spells than the maximum are memorized, random spells will be unmemorized when the player exits the Unit Screen. It is simply not possible to memorize fewer/more than the intended number of memorized spells.
Scripting Spellcasters for Combat
In combat, a spellcaster will cast spells randomly from among the spells they have memorized. They will not cast totally useless offensive spells. Some examples of totally useless spells would be trying to use fireballs on Lesser Devils (immune to fire). Spells that ward against different types of attack, such as Venom Ward against poison, will be cast regardless of whether they will be useful in that particular battle or not. The memorization and scripting mechanics are deliberate design decisions intended to reduce the reliability of magic, reduce the abuse potential of certain spells and to make it more beneficial to learn more spells.
Special Abilities
The various units in the game have a wide variety of special abilities that affect their performance in combat, how quickly they move and how quickly they heal (if at all), among other things. Special abilities are shown as a row of small icons below the attacks (or in the case of spellcasters, below the spells) of the unit. Some of the significant and most common special abilities are listed here. The list contains some of the more common special abilities in the game, but there are a lot more of them, too many to describe in the manual.
Movement Abilities
Movement abilities affect how many AP a unit has and how many AP it takes for it to move to various terrain on the world map. Some movement abilities even allow moving to squares denied to other units. Normal units have 3 AP.
Slow: These units have 2 AP (icon: snail)
Fast: These units have 4 AP and move twice on the battlefield every combat round. (icon: moose).
Battle Fast: The unit is fast on the battlefield, but moves at normal speed on the world map. (icon: rearing lancer)
Immobile: Cannot move in combat.(icon: statue)
Stationary: Cannot move on the world map.
Aquatic: Cannot move on land (icon: shark)
Amphibian: Can enter water squares.(icon: salamander)
Flying: Can enter any land terrain at the cost of only one AP. In combat flying units move 3 squares every round until they land and fight (icon: wings)
Floating: Can enter any land terrain at the cost of only one AP, except mountains, which cost two AP. (icon: jellyfish)
Giant Sized: The AP cost of entering any square is reduced by 1 AP, to a minimum of 1.(icon: giant)
Mountain Move: The AP cost of entering a mountain square is reduced by 1. (icon: mountain goat)
Snow Move: There is no AP penalty for moving over snowy terrain (icon: a pair of skis)
Swamp Move: Moving to a swamp square only costs 1 AP. (icon: hippopotamus)
Desert Move: Moving through deserts and desert-like squares only costs 1 AP. (icon: camel)
Wall Climbing: The unit can climb over walls in battle (icon: spider)
Stupid: Cannot be controlled and will move on their own and without the need for commanders. (icon: donkey)
Stealth & Scouting
Stealthy and invisible units cannot be seen on the world map by armies without the requisite special abilities. Stealth and invisibility have no effect in combat, only on the world map. If an enemy enters the same square as the stealthy or invisible unit, there will be combat. The special abilities related to stealth and detection are:
Stealth: A stealthy unit can only be seen by a unit that has the Acute Senses or Spirit Sight ability. (icon: hooded cloak)
Forest Stealth: The unit is stealthy in a forest or jungle. (icon: hooded cloak behind leaves)
Invisibility: Invisible units can only be detected by Spirit Sight. (icon: outline of an empty cloak)
Acute Senses: Can see stealthy units.(icon: open blue eye)
Spirit Sight: Can see stealthy and invisible units. (icon: open red eye)
For more on stealth and scouting concerning armies, see Chapter Armies.
Damage Reduction & Immunities
These special abilities affect the amount of damage or the effects suffered from attacks.
Resistances reduce the damage suffered from an attack type. Immunities offer complete protection against that type of attacks. A 100% resistance will also offer complete immunity.
Vulnerabilities increase the damage suffered from a type of attack. The icons for the vulnerabilities are the corresponding damage type icons crossed over with a red X.
Blunt Resistance: Half dmg from blunt weapons
Pierce Resistance: Half dmg from piercing weapons
Slash Resistance: Half dmg from slashing weapons
Fire Resistance (x): Fire damage reduced by x%. A value of 100 means complete immunity.
Cold Resistance (x): Cold damage reduced x%. A value of 100 means complete immunity.
Shock Resistance (x): Shock damage reduced by x%. A value of 100 means complete immunity.
Poison Resistance (x): Poison damage reduced by x%. A value of 100 means complete immunity.
Charm Immunity: Immune to charm attacks (icon: old male head)
Sleep Immunity: Immune to sleep spells (icon: Zzz)
Mindless: Immune to fear and morale reduction (icon: a pale, drooling face)
Invulnerable: units are immune to blunt, piercing and slashing damage, both normal and magical. (icon: a suit of armor)
Fire Vulnerability: Double damage from fire. If the unit is set on fire, it burns for longer.
Cold Vulnerability: Double damage from cold.
Shield: A shield reduces the damage of incoming attacks by 0-1. Shields are extra effective vs ranged weapons and will reduce damage from bows, slings and similar weapons by 0-2.
Large Shield: A large shield reduces the damage of incoming attacks by 0-2. Large shields are extra effective vs ranged weapons and will reduce damage from bows, slings and similar weapons by 0-4.
Magic Shield: A magic shield reduces the damage of incoming attacks by 0-3. Magic shields are extra effective vs ranged weapons and will reduce damage from bows, slings and similar weapons by 0-6.
Tiny: 50% of all attacks made against creatures with this attribute miss. (icon: mosquito)
Air Shield (x): x% chance of taking no damage from normal non-magical missile attacks. (icon: human covered by a curving magic shield)
Ethereal: 75% chance of taking no damage from non-magical attacks. (icon: blue cloaked figure)
Luck: 50% chance of not taking any damage from an attack. (icon: four-leaf clover)
Auras
Aura abilities are abilities that affect other units for good or ill.
Leadership (x): The unit provides a bonus of x to the morale of units under his command. The units must be assigned to this commander. (icon: red standard with crown)
Local Leadership (x): The unit provides a bonus of x to the morale of all other units within two squares on the battlefield. The other units need not be under the command of this unit. Stacks with the bonus from Leadership. (icon: red standard)
Causes Fear: The unit strikes fear into the hearts of enemies. Any adjacent enemy must pass a morale check vs 1d7 every combat round or flee. (icon: screaming face)
Causes Dread: The unit strikes dread into the hearts of enemies. Any enemy within 2 squares must pass a morale check vs 1d8 every combat round or flee. (icon: screaming face)
Causes Terror: The unit strikes terror into the hearts of enemies. Any enemy within 3 squares must pass a morale check vs 1d9 every combat round or flee. (icon: screaming face)
Awe (+x): Enemy units attacking this unit in melee must pass a morale check (with a penalty of x) in order to successfully land an attack. Awe does not affect ranged attacks or spells. (icon: halo)
Fire Aura (x): Any enemy attacking this unit in melee will take some fire damage. They may also be set on fire, suffering more fire damage every turn until the fire goes out. Units with Fire Aura (5) or greater will automatically set forest and jungle squares on fire upon entering them. (icon: flaming silhouette of a man)
Cold Aura (x): Any enemy attacking this unit in melee will suffer some armor negating cold damage unless immune to cold. (icon: swirling snow)
Poison Aura (x): Any enemy attacking this unit in melee will be poisoned unless immune to poison. (icon: hydra silhouette inside a dark green cloud)
Shock Aura (x): Any enemy attacking this unit in melee will take some armor negating shock damage unless shock immune. (icon: man surrounded by lightning)
Disease Aura: Any enemy attacking this unit in melee will be diseased unless it succeeds with a magic resistance check or is undead. (icon: vomiting face)
Petrification Any: enemy attacking this unit in melee risks being petrified (MR check to avoid 1d999 points of magic damage). (icon: head of a medusa)
Blood Vengeance (+x): Any enemy damaging this unit must succeed in a MR check or suffer the damage himself while the target is unharmed. The bonus (+x) is the penalty to the MR check. (icon: man bleeding from his side)
Final Strikes
Final Strike abilities are triggered when the unit is killed and usually cause damage to any nearby enemies.
Fire explosion on death (x): When this unit dies it will explode in a ball of fire. The fire will hit everyone around the unit, both friends and enemies. (icon: broken fiery snowflake)
Poison Explosion on death (x): When this unit dies it will explode in a cloud of poisonous fumes. The poison will hit everyone around the unit, both friends and enemies. (icon: broken green snowflake)
Shard explosion on death (x): When this unit dies it will explode in a hail of sharp fragments. The shards will hit everyone around the unit, both friends and enemies. (icon: broken white snowflake)
Putrid explosion on death (x): When this unit dies it will explode in a spray of putrid, rotting flesh. The shards will hit everyone around the unit, both friends and enemies. (icon: broken brown snowflake)
Healing & Sanity
Healing abilities have an effect on how fast the unit heals and sometimes allow it to heal battle afflictions (see section Battle Afflictions).
Never Heals: All damage done to the unit is permanent. (icon: drop of blood)
Fast Heal: The unit will be fully recovered from any non-fatal damage in at most two months and will heal battle afflictions over several months. (icon: snake wrapped around a staff)
Regeneration: The unit heals roughly 5% of its HP every combat round. Battle afflictions take at least a month to heal. A regenerating unit killed in battle may rise from the dead unless it suffered at least 150% of its HP worth of damage. (icon: two-headed hydra)
Immortal: units will reform in their home when they are killed. Reforming can take a few months, during which time they cannot act. Immortal units heal battle afflictions at the rate of roughly one affliction every two months. See chapter Immortality for more information. (icon: phoenix rising from a pyre)
Diseased: units have their Strength lowered by 1 and have a 50% chance of taking 1 point of damage each month. This check is applied every month until the unit dies or the disease is cured. Disease is considered a battle affliction for the purposes of healing. (icon: pockmarked face)
Insanity (x): Insane commanders have a chance of refusing to follow orders on any given turn. Certain types of actions and spells inflict insanity. (icon: gray bearded face)
Regain Sanity (x): The unit regains x amount of sanity every turn. Insanity is usually caused by necromantic reanimation of human and animal corpses. (icon: red x over a gray bearded face)
Other Abilities
Special abilities in this category don’t fit well into any of the other categories.
Army Trainer: +1 experience point per month for every unit in the same army. (icon: sword diagonally over a red standard)
Berserker: A unit with the berserker ability will go berserk if it is hit in combat. Going berserk grants a +1 strength bonus, a +10 morale bonus and the ability to continue fighting event with negative Hit Points. Negative Hit Points cannot exceed 20% of the normal maximum number of Hit Points. (icon: berserking warrior)
Blessed: units gain a bonus to their combat abilities when a spell of blessing is cast on them. The particulars of the bonus depend on the degree of divine favor of their god. (icon: candelabra)
Corpse Eater (x): This monster can reproduce quickly by devouring corpses. X is the chance of devouring a corpse each month. (icon: ribcage and bone)
Spawn Monsters: This monster will create other monsters of some type every turn. For example, a Dwarf Queen creates Dwarf Workers.
Trample (x): This monster will run over and trample every smaller enemy in its way. The value of this ability is the damage rating from being trampled. (icon: elephant)
Experience
As they spend time traveling and fighting battles, the player’s troops gain experience. Experience points (XP) are displayed in the primary statistics of a unit and accumulate at the rate of 1 XP per turn plus 1 XP per battle. The only other source of XP is a commander with the Army Trainer special ability. Mindless units do not gain experience at all. Once a unit gains a sufficient amount of experience, it becomes experienced and gains bonuses.
Experience bonuses are denoted by star icons on the row of special abilities. The maximum experience level is four stars. Experience bonuses are listed in the table below.
| Level | XP | Bonus |
|---|---|---|
1 |
20 |
+1 HP, +1 Mrl |
2 |
60 |
+1 HP, +1 Str |
3 |
120 |
+1 HP, +1 Mrl |
4 |
200 |
+2 HP, +1 MR |
Rank
Units have three placement ranks, which determine where the unit is placed in the army organization and on the battlefield. Back rank units are usually “pure” mages or non-combatant leaders and are always placed in the rearmost rows of an army or on top of walls or towers. Middle rank units are units that (usually) possess a ranged weapon or a spell as their primary mode of attack, but also include commanders who do not lead from the front. They are placed behind the front line units in the army. Front rank units are units whose primary attack is a hand to hand weapon. These units are placed in the front rows of the army.
Battle Afflictions
Battle afflictions are permanent injuries and disabilities that the unit has suffered as a result of being wounded in combat. Battle afflictions cause the unit to have various penalties to primary statistics or otherwise hinder its performance. Battle afflictions do not heal over time like regular wounds unless the unit has a special ability that allows healing afflictions as well (e.g. Fast Heal, Regeneration or Immortal). There are no spells or rituals that heal battle afflictions. See Chapter Healing for more on healing. Cursed units have a greatly increased chance of suffering battle afflictions when wounded.
Battle afflictions appear as red hearts on the row of special abilities, one heart for each affliction, except for disease, which has its own icon. Right click on the icon to get a description of what penalties it gives.
The affliction of Temporary Insanity is kind of special, it renders the unit 100% insane until it heals. There is a chance to heal from Temporary Insanity every turn and this is the only affliction that will heal by itself. Note that it is possible for regenerating or immortal units afflicted with temporary insanity to heal from the affliction immediately on the next turn, but they will still be unable to move. This is because at the beginning of the turn the unit is insane and will refuse to accept orders during that turn. Healing checks for afflictions occur after the insanity check, so the unit is still recovering even though the affliction disappears. It will be able to move normally the next turn. This means that normal units will also lose one turn when they finally heal from this affliction.
Armies
This chapter deals with managing armies on the world map and gives some tips on what certain types of units can do.
Armies on the Map
Armies on the world map appear as colored squares containing a graphic of one of the units in it. These colored squares are called army tokens. The graphic may be of one of the commanders leading the army, an especially powerful monster in the army or of the unit that makes up the greatest portion of the army. Larger armies are shown as a pile of multiple tokens stacked on top of each other, the more the larger the army. The color of the army corresponds to that of the controlling player. The armies of Independents have a light gray color. The armies of Special Monsters have a very dark gray color. The armies of Horrors have a very dark red color.
Army Screen
Right click on an army token to open the Army Screen. This screen displays all the units in the army that the player can see. Right-clicking on a unit will display its stats. For more information, see Chapter Units.
Hold down TAB to hide all armies on the world map so you can see the underlying terrain.
Army Ranks (Rows)
The army is organized into rows (or ranks) in the Army Screen. There are 20 normal sized units in each full row. Large units take up four squares on the battlefield (2 x 2). Giant-sized monsters occupy nine squares (3 x 3). Armies can have several rows. The arrow keys can be used to scroll the Army Screen to the side to manage larger armies, or you can hold down the mouse wheel and pan with the mouse. The first ranks of an army are its front line, the melee units who engage in hand to hand combat with the enemy. Any melee units behind the first row will act as a reserve and will move to engage enemies in any gaps that might open in the front line.
Commanders are not automatically placed in the rear ranks, but according to their placement rank. Some commanders are very melee oriented and will be found on the front lines of the army (e.g. Unexpected Hero, Barbarian Leader) while others lead from among the archers in the rear ranks (e.g. Captain) or even from behind the entire army (e.g. Senator).
Placement Ranks
Units in CoE5 armies have three primary placement ranks: Back, Middle and Front.
Back rank units are usually “pure” mages or non-combatant leaders and are always placed in the rearmost rows of an army.
Middle rank units are units that (usually) possess a ranged weapon or a spell as their primary mode of attack, but also include commanders who do not lead from the front. They are placed behind the front line units in the army.
Front rank units are units whose primary attack is a hand to hand weapon. These units are placed in the front rows of the army.
Front- rank units are melee units who will be placed in the rear rows of the front rank units if there are more than one row’s worth of front rank units. Otherwise they are placed in the front. Pikemen have this designation because they can attack targets from a range of 2 squares.
The placement ranks are independent of the presence of spellcasting ability, ranged weapons or melee attacks available to the unit. A unit with nothing more than melee attacks can belong to the Middle placement rank and will thus be placed in the middle rows with the ranged units (e.g. Captain or Centurion, who do not lead from the front line). Similarly, Front rank units may possess ranged attacks or spellcasting ability, but they are still placed among the front lines and will only use ranged weapons or spells according to the restrictions governing those weapon types.
The order of units of the same rank (front, middle, back) is usually determined by its HP. Highest current HP units are placed in the center of the rank. Wounded units are moved towards the flanks or to rows behind the first one.
Magic items and battle afflictions can change where a unit is deployed. E.g. giving a wand to a unit will make it deploy one rank further back. Getting the Battle Fright combat affliction will also make a unit deploy one rank further back, but non-commanders will not deploy in the rear rank, as that might invite disciplinary actions from the commanders.
Stealth and Scouting
Normal armies are visible on explored areas of the map in the immediate vicinity of armies or structures owned by the player. Explored areas farther away are shrouded by the Fog of War and it is impossible to see armies moving there.
Some armies may have units with the special abilities Stealth, Forest Stealth or Invisibility in them. Such units remain undetected even when viewing the enemy army in the Army Screen (unless you are the owner of that army). It is also possible that an entire army is composed of units with these properties, effectively rendering them invisible to enemies until they attack or the enemy blunders into them by accident.
To counter stealthy units and armies, most armies (or at least competently led armies) employ scouts. Scouts are specialist units who possess both Stealth and Acute Senses, allowing them to detect stealthy armies while remaining hidden at the same time. Scouts are available through special recruitment. Units with Spirit Sight are far less common and the means of acquiring them vary more widely. Most often they are summoned.
|
Note
|
Scouts are not commanders! Their function is to serve as the eyes and ears of an army, not hare off on their own and get killed when a larger army blunders into them by accident. Exploring the world requires an actual commander, with or without an army. If you send a commander to explore without troops, make sure he is expendable. |
Combat
This chapter discusses combat in the game.
Entering Combat
In CoE5, combat is initiated whenever two armies that are not allied move into the same square. Whoever moves into the square occupied by the army of another player, independent or special monsters is the attacker. Initiating combat uses up all of the army’s remaining Action Points.
A special case of initiating combat is when more than two different factions are involved. The armies of allied players can move through the same squares and stay in the same square and will defend the square against enemy attacks as a single force. In single player games and hotseat games you can defend together with your ally but you cannot attack together. In network multiplayer games it is possible to attack together with your ally.
Combat can be initiated unintentionally if an army moves into a square containing stealthy or invisible units that it cannot see. When this happens, the combat begins as an Ambush. For this reason keeping scouts or other units with Acute Senses or Spirit Sight in an army is important. Whenever an army enters combat, a symbol of crossed swords is placed over the square until the end of the player’s turn when combat is resolved. This makes it possible to move several armies to attack a single enemy army simultaneously.
Combat resolution is displayed at the end of the turn in the Combat Screen. Unless you are playing a network game, in which case the player gets a message and a chance to view the combat at the beginning of his next turn. Combat resolution is automatically handled by the battle AI. The player has no control over the actions of their troops during combat, but will be shown how the battle progresses.
Combat Screen
This section discusses the combat screen interface.
Overview of the Combat Screen
The combat screen has three main components.
-
Battle messages (blank space on the left)
-
Battlefield (a grid of 28 x 20 squares)
-
Controls (upper right corner)
Battle Messages
The battle messages list all of the events that happen during the combat such as hits, misses, spellcasting, how much damage was done and how special abilities affect attacks (e.g. a shield defense reducing incoming damage from a successful hit). The messages can be scrolled with the mouse wheel or the + and – keys.
Battlefield
The battlefield is a grid of squares, 20 squares tall and about 30 squares wide, more for large battles. Depending on the terrain where the battle takes place, there may be obstacles on the battlefield that units must either go around, climb over or destroy.
Controls
In the upper right corner of the Combat Screen there are controls to adjust the speed of the battle replay, which allow the viewer to slow down or speed up the pace or pause the combat view.
?         Display keyboard shortcuts
f         Toggle speed (normal / fast fwd)
n         Normal speed
s         Increase speed by 1 level
z         Slow motion
q         Skip battle
l         Hide / show battle messages
g         Hide / show grid
t         Hide / show terrain
+ / –     Scroll battle log up / down
SPACE     Pause
Hit Mechanics
Attacks always hit, unless they are modified by a battle affliction or special ability that makes them miss. Afflictions that can cause attacks to miss are lost eyes and blindness. Special abilities that can cause attacks to miss are e.g. Displacement and Bad Sight.
Preliminary Combat Actions
Preliminary combat actions take place before the start of actual combat between normal units.
Prebattle Effects
Prebattle effects take place before the battle begins and are applied before any other actions. They are only applied once.
Assassination
Assassination attacks take place at the very beginning of combat, before any other attacks, and are only available to the attacker. Unless it has multiple assassination attacks, every assassin on the attacking side will make one assassination attack each before the combat begins.
Siege Weapons
If the battle takes place in a city, castle, guard tower or other similar fortified structure (indicated by the catapult icon in the map popup) and one or more sides in the battle has siege weapons, the combat sequence is altered. In siege situations, siege weapons are used exclusively for the first fifteen rounds of combat and siege weapons on both sides will fire at targets that are in range, up to a number of times that the limit of their rate of fire allows within that time period. Siege weapon rounds are counted as combat rounds -15 to -1.
After the siege weapons phase, the combat will proceed according to the normal sequence.
Siege Tunneling
Some monsters have the Siege Tunneling ability. This means they will burrow down below ground at the start of the siege phase and then surface near the enemies often inside the walls when the combat starts.
Monsters with Combat Burrowing ability will continue to burrow at random times during the combat making them difficult to surround for the enemy.
Combat Sequence
The combat sequence section describes what happens once combat begins and in what order. The combat sequence is followed every round until the battle has ended.
Battle Fatigue
Every combat round, battle fatigue is checked first. The start of battle fatigue damage depends on the size of the engagement, but it can never happen before combat round 100. In very large battles, battle fatigue may kick in significantly later than round 100.
Once units start taking battle fatigue damage, each unit takes (1 + nbr of battle fatigue rounds) armor negating magical damage each round. This means that the damage increases every combat round and the most likely winner is the side with the single highest HP unit on the field.
15 rounds before the battle fatigue sets in, regeneration fatigue will set in and dead units will no longer be able to regenerate even though they might have taken too little damage to be irrevocably dead. If their side wins, they will get some rounds after the battle to regenerate, giving them another chance of rising from the dead.
Remove Clouds
The second phase of the combat sequence is removing cloud effects from the battlefield (poison cloud, disease cloud etc). Each cloud effect on the battlefield has a 50% chance of being removed.
Move All Units
All non-stationary units on the battlefield move one step. Attacker moves first.
Move Fast Units
All Fast units on the battlefield move a second step. Attacker moves first.
Check for Fear Effects
If there are units that Cause Fear on the battlefield, Fear is applied to all units facing them. Any units that fail a Morale check will become panicked and run away from combat. Panicked units will start moving toward the edge of the battlefield and will not fight enemies, unless the enemy is blocking their retreat. Once a panicked unit moves off the edge of the battlefield grid, it is removed from combat. Any units on the victorious side that ran away from combat will return after the battle. Any units that ran away from the losing side are lost.
This means that fearsome units are an important tactical asset and force multiplier. They may be pivotal in winning a battle for a small force facing many times its own number.
Determine Attacks & Set Initiative
In this phase, the battle resolution sequence determines which weapon each unit will use to attack. Most units only have a single weapon and they will use that. Some units may have more options and weapons whose use is conditional on some other weapon not being used (see section Weapon Types). Once the attack to be used has been determined, the unit is assigned an initiative value. The unit’s initiative value is the initiative value of the weapon he uses. There is no random component to the determination.
|
Tip
|
A spearman attacks with a spear, which has an initiative value of 6. Thus his initiative value is always 6 unless he changes the weapon to something else. |
Magic Wands
Any units in possession of magic wands make their wand attacks now (if they decide to use it), before other attacks.
Perform Attacks in Initiative Order
All units perform their attacks on available targets according to the order of their initiative value. Units with the same initiative are resolved in random order within that initiative value. Units with highest initiative attack first.
Apply Persistent Effects
Persistent unit effects are applied to those units which are under the influence of such an effect. For example, damage from burning or poison, healing from regeneration etc. are applied at this stage.
Apply Battlefield Effects
Battlefield wide effects, such as Wall of Torment attacks and poison clouds are applied here.
Check If Battle Is Over
The battle is over when one side no longer has any troops on the battlefield. If the battle is over, run the combat sequence for another 75 rounds to make sure fire, poison and similar effects get to run out. Battle fatigue damage is not applied during these clearance rounds
On the Battlefield
This section describes some of the conditions on the battlefield and related mechanics in detail.
Unit Placement
Units are placed on the battlefield in opposing rows, the defender on the right and the attacker on the left. Units are placed according to their rank designation.
If the combat is an ambush, the party that blundered into the ambush will not be placed properly for battle, instead they will fight in the line that they were marching in. The ambushing forces will be distributed around it, usually with most troops in the vicinity of the front of the line, in order to strike down the commanders quickly.
Obstacles
The terrain of the battlefield is determined by the terrain of the square where the battle takes place. There may be natural obstacles, such as rock formations (common in mines and mountains) or maybe trees and bushes (common in forests).
If there are covered locations suitable for archers on the battlefield, back and middle rank units from the defender may be placed behind them at the start of battle. The attacker must usually go around or over an obstacle in order to attack the unit taking cover. Obstacles can be bypassed by wall climbing, ethereal, flying or giant sized units.
All obstacles have stats and Hit Points and can be attacked. Once the obstacle’s Hit Points are reduced to zero, it is destroyed and can be passed normally. Hold down the tab key to hide units if you need to inspect a terrain feature that is below a unit.
Spellcasters
Any spellcasting commanders and units will usually cast a spell in their repertoire if they are able to do so. If they have no effective spell available they do nothing unless engaged in melee or they have other options such as ranged weapons.
Spellcasting is very difficult in melee and (most) spellcasters are automatically placed in a back row if possible. The chance to successfully cast a spell while engaged in melee is 25%.
The effects of spells are usually applied immediately (subject to possible magic resistance, strength resistance or morale checks). Some spells cause effects that are applied over several rounds of combat (e.g. poison) or effects that last for life (e.g. curse).
Ranged Weapons
Units with ranged weapons will fire them at the enemy if they are in range. If they are not in range, the units will move toward the enemy in order to acquire range.
Different ranged weapons have a different rate of fire. Bows and longbows are fired every combat round. Crossbows are slower and take one combat round between shots to reload. Arbalests (heavy crossbows) require two rounds to reload.
Mundane missile weapons like bows do half damage (rounded up) if they shoot at ranges greater than half the maximum range (rounded up). Units standing on walls have +1 range, or +2 if the walls are high (2 squares of walls in front of the battlement).
It is impossible to fire normal ranged weapons in melee, so if ranged weapon units are left without an infantry screen and engaged in melee, they will use their secondary weapons (usually a dagger or another less powerful weapon) for defense. For this reason you should make sure your ranged units always have plenty of infantry cover.
Front Ranks (Melee)
Melee units will attack as many times as they have weapons. Each weapon may strike a different unit within range. Some weapons may be used only if some others are not.
|
Note
|
In combat units may make attacks even when the enemy is completely immune, in which case the attacks cause no damage at all. |
Summoned Creatures
Some spells summon monsters to aid the caster in combat. Some magic items may also act as summoning spells and summon monsters to aid the bearer, either at the beginning of combat or even every combat round. Summoned creatures appear instantly and any surviving summoned creatures will vanish after the battle is over.
Summoned creatures do not act immediately. They only begin to act on the round after they appear, at which point they are indistinguishable from other units and act according to the normal combat sequence.
Weapons Damage and Death
This chapter discusses weapons, damage and death in the game in more detail.
Weapons
The weapons of a unit are listed after the primary statistics. Some units may have the same weapon more than once, indicating that they are skilled enough to make multiple attacks in one round with the same weapon. High Lords and Gladiators are examples of such units. For the purposes of combat and damage mechanics, spells function exactly like weapons and spellcasting is only limited by the restrictions of a particular Cast Spell type weapon.
Weapon Types
There are several weapon types. Usually weapons with range 1 are melee weapons that can only be used in melee and those with longer range are missile weapons that cannot be used in melee. Spells only have a small chance of being used if the caster is engaged in melee combat. If a spell is cast no other type of attacks will be done that round. However sometimes the attack name is followed by a special marker (e.g. two stars **) that indicates that it can be used in other circumstances than usual.
Melee Weapon#
Either this attack or the following attack will be used, but both cannot be used on the same combat round.
Ranged Weapon*
This ranged weapon may be used in melee instead of other attacks.
Ranged Weapon**
This ranged weapon can also be used in melee and in addition to other attacks.
Ranged Weapon#
Either this attack or the following attack will be used, but both cannot be used on the same combat round. This ranged weapon can be used in melee.
Cast Spell**
This spell attack may be used in melee and in addition to other attacks.
Cast Spell#
Either this attack or the following attack will be used, but both cannot be used on the same combat round. This spell attack can be used in melee.
Special: Siege
Siege weapons are only used when attacking or defending fortified structures like walled cities or guard towers.
Special: Burst
Usually a weapon only hits one unit, but a large burst area means it will cover multiple squares. Weapons with burst damage will damage structures and vegetation in the square as anyone standing there.
Special: Assassination
Assassination attacks will be used once before the battle starts. For assassination attacks to be used the assassin must be on the attacking side.
Range
This is the weapon’s range in squares. Melee weapons have a default range of 1 and a bow has a default range of 5. Really long melee weapons like pikes have a range of 2 and can strike units up to 2 squares away, even though it is a melee weapon.
Damage Types
Weapons can do several different types of damage. Each type may be normal or magical (e.g. magical or non-magical blunt damage).
-
Blunt (icon: hammer). Normal damage that is caused by e.g. hammers and maces.
-
Piercing (icon: spear). Normal damage that is caused by e.g. arrows and spears.
-
Slashing (icon: sword). Normal damage that is caused by e.g. swords and axes.
-
Fire (icon: flame). Anyone wounded by fire damage also risks catching fire. Burning units will take damage each combat round until the fire stops.
-
Cold (icon: icicles). Anyone wounded by cold damage also risks getting the Numbness affliction. Units with Numbness gets -1 Strength and takes +1 damage when wounded by any attack.
-
Shock (icon: lightning bolt). Anyone wounded by shock damage also risks getting stunned. A successful magic resistance or Strength check is required to not be affected.
-
Poison (icon: drop of green liquid). Poison damage will not result in any immediate damage, instead it is spread out over a number of turns.
-
Acid (icon: drop of purple liquid). Acid damage is very difficult to resist as very few units are immune to this type of damage.
-
Magic (icon: blue-white starburst). Pure magic damage is often caused by spells. Other types of damage can also combine with magic, meaning that they can affect ethereal creatures without any trouble.
Armor subtracts from damage received unless the attack causes armor negating (AN) damage.
In addition to these damage types there are also many attacks that cause special effects that do not cause actual damage (e.g. confusion, charm, paralyzation).
Area of Effect
All weapons have an area of effect. Most weapons affect a single target. This is denoted as “area of effect: single target” and affects a single enemy in the square where it strikes. If no enemy is in the square it will affect any ground object there instead.
There are a few different types of area of effects:
Burst affects a number of squares equal to the burst value. The shape of the affected area may depend on the type of attack. Some spells or other attacks have a fan-shaped distribution, others a starburst and yet others a sphere, etc.
Beam area of effect is always a number of consecutive squares and the weapon affects all squares in the path of the beam.
Strike effects are usually a property of spells and each strike affects a single target. The distribution of the strikes on the battlefield can be entirely random within range of the weapon or spell and can strike targets in different parts of the field. The Necromancy spell Dark Power is an example of this type.
Cone weapons affect a conical area in front of the attack’s origin point and affect all squares in that area. There are also wide and narrow cones, meaning they affect more or less of the surrounding squares.
All area effects that affect one or more squares will also affect any ground objects in the same square. E.g. an archer standing on a parapet is hit by a fireball. This will cause the parapet he is standing on to take damage from the fireball in addition to the archer himself.
Weapons and spells that affect multiple targets in beam or cone attacks can be just as dangerous to your own forces as to the enemy, sometimes even more so.
Additional Weapon Attributes
Weapons may have additional attributes that modify their behavior to differ from a standard weapon. The most common additional attributes are described below.
Extra Effect if Hit If the weapon hits the target, the target suffers an additional effect, which may be different type of damage (e.g. poison from a venomous bite) or possibly special damage.
Armor Negating weapons ignore all armor values, defense bonuses and shields of the target.
Assassination weapons are used before the battle begins to make a free attack on the enemy. Assassination attacks may only be used by the attacking player. Assassination weapons are also modified by all other additional attributes.
Drain In addition to causing damage to their targets, life draining attacks add an equal amount of Hit Points to the attacker, healing them of damage already suffered or augmenting their Hit Points beyond the normal maximum. The maximum amount of HP gain is twice the unit’s normal maximum HP. This limit is affected by reductions of maximum HP due to afflictions. The HP augmentation wears off with time.
Long weapons may be used to strike enemies two squares away.
Negates Shields, damage from this attack cannot be reduced by the Shield or Large Shield special ability.
Siege weapons are only usable in battles that take place in a square that is considered to be a fortification, such as a city, guard tower, castle or similar structure. See Chapter Combat for more details on siege mechanics.
Strikes anywhere, This weapon may strike anywhere on the battlefield.
Strikes rear This weapon always strikes a target in the rearmost enemy row. Typically only a property of assassination weapons.
Sweep If the attack kills its target, the leftover damage will immediately carry on to a new attack against another melee target. Great Swords and Great Clubs have this attribute.
Full Sweep The attack will target all nearby targets, but with -1 damage after each target. Dragons sweeping with their tails have this attribute.
Death
When the Hit Points of a unit reach 0, it dies. Death is permanent, unless a unit is immortal. Dead units cannot be brought back to life by any means. The only exception is if a regenerating unit on the winning side of a battle is killed but suffered less than 150% of its HP in damage. In this instance the unit has a chance to return from the dead, but it is not guaranteed. Regenerating units on the losing side cannot return from the dead, since the winners make sure they are sufficiently dismembered to prevent any revival.
Immortality
Immortal units reform at their home after they are killed. If their home is lost, even immortal units die permanently when slain. Note that the home location is not automatically the player’s home citadel. For example, the home of a Vampire is the old castle ruin where the blood rite ritual to turn a necromancer to a vampire was performed.
A special form of immortality is Other Planar Immortality. Gods and powerful Demon Lords often have this ability which means that they must be slain on their home plane in order to die permanently. If slain on another plane, they will respawn on their home plane and usually shred any bindings that might have held them previously. E.g. a demon lord controlled by a demonologist is slain on Elysium. This will force it to respawn in its home in Inferno and it will be free from the Demonologist’s control in the process.
Damage Display
Damage taken by units in combat is displayed as floating numbers that rise up from the unit and fade away on the battlefield. Damage is normally displayed as floating red numbers. If the unit suffers from special damage as an ongoing effect such as decay or burning or receives damage from striking an enemy with a protective ability such as Fire or Cold Aura, the damage is displayed in a different color. The colors for strikeback and ongoing damage effects depend on what type of damage the unit has suffered. Healing effects are displayed with a plus sign.
-
Red Blunt, piercing, slashing
-
Yellow Fire
-
Blue Cold, drowning
-
Light Blue Shock
-
Green Poison
-
Pale Purple Acid
-
White Magic
-
Purple Decay
Damage Mechanics
Boolean Damage
Some damage effects are boolean in nature, meaning that they either affect the target, in which case the target suffers the full effects of the damage, or they do not affect the target at all. Boolean damage is often subject to a resistance check, usually against magic resistance, morale or strength and sometimes multiple attributes can be used to resist the effect. Many special damage effects, especially if caused by spells, are boolean in nature.
Open Ended Dice
Most weapons and damage dealing spells in the game inflict a variable amount of damage (for example, 1-5 points of piercing damage from a spear). Damage in Conquest of Elysium is inflicted on the basis of an open-ended die. This means that when damage is rolled, if maximum damage is rolled, another die of additional damage is rolled. An additional die is rolled every time the last one comes up with the highest possible value. Thus a lucky hit can cause massive damage far in excess of normal.
All additional dice have 1 point subtracted from the result of the roll.
|
Note
|
Weapons with a damage rating of 1 have a 50% chance of having the damage rating increased to 1d2 and becoming an open-ended die. |
|
Tip
|
A pikeman hits a target and rolls damage: 1d5 (oe), with results 5, 5, 5, 4. The actual result is 5 + 4 + 4 + 3 = 16. |
Semi-Open Ended Dice
Semi-open ended dice function like open-ended dice, but only the first result is counted in full. All of the additional dice rolls are first reduced by 1 and the sum of the additional dice rolls is halved before adding it to the result of the first die. All fractions are rounded down.
|
Tip
|
A semi-open ended die roll of 1d5, with results 5, 5, 5, 4 would have an actual result of 5 + (4+ 4+ 3) / 2 = 10. |
Damage Bonus
If a unit has a damage bonus, the bonus is not added directly to the result of the open-ended die roll. Instead, the damage bonus increases the size of the open-ended die. The damage bonus is displayed as 1dX(+Y), but in actual fact the effect is a damage value of 1d(X+Y). The damage bonus is displayed this way for aesthetic reasons and because some weapons can be replaced by weapons from items, in which case the damage bonus is applied to the new weapon.
|
Tip
|
The Troll King has a damage bonus of 25, so his Club (1d3 damage) actually does 1d28 damage. A hoburg soldier has a damage bonus of -2 so his spear (1d5 damage) only does 1d3 points of damage. |
Immobilized Targets
Immobilized units (stunned, paralyzed etc.) take 2 extra points of damage from every attack.
Damage Calculation
Damage from a successfully landed attack is applied through the following steps:
-
Roll total damage, open-ended dice
-
If the damage type was elemental (fire, cold, shock) or poison and the target has a vulnerability to that type, double the damage total
-
Add 1 if the target was immobilized
-
If target is standing on a wall, add 0 to (3x fortification level) to its armor
-
If target has armor, subtract the armor value from the damage total unless the attack was armor negating
-
Subtract 0-1 if the target has a shield (0-2 if large shield), unless the attack was armor negating or negates shields
-
If the damage type is blunt, slashing or piercing damage and the target has the relevant resistance, apply the resistance reduction (50%) to the damage total
-
If target has resistance to the damage type, apply the appropriate percentage reduction to the damage total
-
If the resulting damage value is greater than 0, subtract the result from target’s HP. All fractions are rounded down. Damage reduction may result in the target not taking any damage at all. For more information on the various damage reduction abilities, see chapter [Damage Reduction and Immunities]
Poison Damage
Poison damage works differently from other types of damage. The amount of damage suffered is determined normally, but it is applied differently. When a unit is inflicted with a total amount of poison damage, it takes 10% of the total every round (rounded up to the nearest whole number) until all the poison damage has been suffered.
Already poisoned units can become more poisoned by repeated exposure to poison attacks. The new value is added to the existing total poisoning so far. Poison Immunity grants immunity to new poison damage, but does not negate prior poisoning.
|
Tip
|
A Witch hits an Elephant with the spell Venom and poisons the Elephant for 13 points of damage. Over the following combat rounds the Elephant suffers all 13 points of poison damage in increments of 2, 2, 1, 1, 1, 1, 1, 1, 1, 1 and 1 points at which point the total has reached zero. |
Special Damage
Some types of attacks do special damage, whose effects are not immediate or which will have an impact on a unit’s performance. Special damage that causes an effect will produce an icon in the unit’s row of special abilities.
Charm & Enslave
Both Charmed and Enslaved units immediately switch sides and attack their former comrades.
Charmed units retain their previous status, which means a charmed commander will still be a commander in the service of his new master. After the battle, charmed commanders will be placed under the command of the commander who charmed them and will be inactive until activated from the Transfer Units screen. See chapter Transfer Units for more information.
Enslaved units lose their commander status and become regular units. Enslaved mage commanders do NOT lose their spellcasting abilities, but can no longer learn new spells or use rituals. Enslaved units are automatically assigned to the commander who enslaved them. There is no icon for being charmed / enslaved.
Fear
Fear damage is applied against morale. If the damage roll from fear exceeds the morale of the target, the target panics and runs away. Fear attacks may sometimes be resisted with magic resistance, in which case the fear attack is negated and fear damage is not applied. Sleeping units are not affected by fear. They will have nightmares instead, but this does not have any effect. It is simply an indication that the condition of being asleep protected them.
Debuffs
Debuff effects weaken the target’s combat effectiveness, make it more vulnerable to damage, cause damage over time or cause permanent disabilities.
Curse
Cursed units have a greatly increased chance of receiving battle afflictions when they are hit. (icon: black demon head inside a red pentagram)
Decay
Decay Units suffering from decay take 1 point of damage per combat round until they die. Decay can usually not be survived, but after the battle has ended the effect will run out eventually and some extraordinarily tough creature might be able to survive it. (icon: hourglass)
Disease
Diseased units have their Strength lowered by one point immediately, but take no extra damage in combat. After combat, they have a 50% chance of taking 1 point of damage every month until they die. Disease is considered a battle affliction for purposes of healing. (icon: pockmarked face)
Weakness
Weakened units have their Strength and damage reduced by 2. (icon: purple pentagram)
Confusion
Confused units do nothing (50% chance) or switch sides (10% chance) or move in a random direction instead of advancing (75%). (icon: pale green pentagram)
Immobilization
Immobilization effects render units immobile, preventing them from taking any actions other than trying to free themselves. Immobilized units take one extra point of damage from all attacks.
Earth Grip
Earth gripped units are immobilized until they pass a strength check vs 2d6. Passing a strength check vs 1d5+7 will have the unit break free and attack in the same round. (icon: brown pentagram)
Entanglement
Entangled units are immobilized until they pass a strength check vs 1d8. Passing a strength check vs 1d5+5 will have the unit break free and attack in the same round. (icon: green pentagram)
Imprisoned in Ice
Units imprisoned in ice are immobilized and gain 2 points of Armor, but take 1 point of cold damage every combat round until the effect wears off (20% chance each round). (icon: pale blue pentagram dripping icicles)
Paralyzation
Paralyzed units are immobilized and cannot do anything until the effect wears off. (10% chance each combat round). (icon: light gray pentagram)
Sleep
Sleeping units are immobilized. The unit sleeps until it is hit or awakens on its own. (5% chance each combat round) (icon: blue pentagram)
Stun
Stunned units are immobilized and cannot do anything until they recover. Stunned units have a 75% chance of recovering every round. (icon: dark gray pentagram)
Slime
Slimed units are not really immobilized and will not take extra damage from attacks, but they have a 50% chance of being unable to act every round. Slimed units have a 10% chance of getting rid of this effect every round. (icon: green slime)
Healing
Healing
Wounded units heal damage at the rate of 10% of their maximum HP per month (rounded up), unless they have a healing special ability such as Fast Heal or Regeneration that allows them to heal faster.
Many non living units have the Never Heals trait and any damage done to them is permanent. The only way for them to heal is usually by giving them a magic item that grants them false life.
Resurrection
Regenerating units on the side that won the battle have a chance of rising from the dead unless they suffered at least 150% of their HP worth of damage when they were killed. Regenerating units on the losing side cannot return from the dead, since the winners make sure they are sufficiently dismembered to prevent any revival.
Resistance Mechanics
This section explains how resistance rolls work. Effects that can be resisted with more than one attribute check against both attributes, and the target is only affected if both checks fail.
Magic Resistance
Magic resistance checks come in three varieties: Easy, normal and hard. They are often referred to respectively as easymr, mr and hardmr when discussing different kinds of checks. All MR checks are rolled against the target’s magic resistance. If the roll is equal to or greater than the magic resistance, the target fails to resist and the effect is applied. MR checks use semi-open ended dice rolls.
EasyMR 1d5 < MR = resisted
MR 2d4 < MR = resisted
HardMR 2d6 < MR = resisted
Strength Resistance
Effects that are resisted with strength (such as the stun effect from the Gust of Wind spell) work exactly like magic resistance checks, but the determining attribute is strength instead of MR.
Magic
Overview of Magic
Magic plays a major role in the conquest of the land and using available magical resources correctly can make the difference between glorious victory and ignominious defeat. There are almost 100 different disciplines of magic, e.g. Pyromancy, that excels at burning enemies and Dark Magic that can summon shadow beings and put terror in the foes. Each magic discipline comes with its own strengths and weaknesses.
Many disciplines bear similarities to each other, yet they have a different focus. Different disciplines may share spells, but spells of the same name cast by mages of different disciplines may differ in their efficacy.
Most mages only know the magic of one discipline. Some rare spellcasters may know two, but they are usually limited to the lower levels of knowledge. Certain very rare mages or powerful spellcasting monsters have mastered multiple disciplines of magic and can wreak havoc on the unprepared because there is never a certainty of what they will throw at their enemies.
Magic Items
The land of Elysium is home to powerful wizards, beguiling witches, dangerous monsters and mysterious locations. There are many kinds of treasures to be found for the intrepid explorer and among them are magical items ranging from useful trinkets to artifacts of great power.
Magic Item Types
Magic items come in six different types:
Magic weapons
Magic helmets
Magic body armor
Magic gauntlets
Magic boots
Magic miscellaneous items
The item types correspond to the item slots of units and a unit must have the correct type of item slot to be able to use a magical item. Usually normal sized humanoid troops have all item slots, larger units usually only have weapon and misc slots, and stranger monsters usually only have miscellaneous slots.
Items can be used by any unit with the correct item slots, not just commanders.
Transferring Items
Items can be transferred from unit to unit by clicking on the item slot where the item is located. This opens the Army Screen, where clicking on the target unit transfers the item to that unit. If the target unit does not have the appropriate item slot or the target’s applicable item slots are full, the item will stay with the current owner and the transfer fails.
|
Note
|
It is possible to give magic items to allies if they are standing in the same square. |
If the bearer of an item dies in combat, surviving commanders pick up the items. If there are no commanders left or their item slots are full, surviving units pick the item up if they have the slots. Items are lost only if there are no units capable of picking them up after the bearer dies.
Magic items are rare and highly seductive items, it is not possible to willingly discard them.
|
Note
|
It is not possible to transfer any magic items when you have been ambushed. |
Activated Items
Some items have an activated power that can be used, but in this instance the unit using the item must be a commander. If the commander cannot use the activated power and tries to do so, there is a message to that effect (e.g. a non-mage trying to use a spell scroll item).
Generic Item Powers
Most items give the bearer one or more benefits. Magic weapons replace the bearer’s normal weapon with a different magical weapon and may provide other benefits, such as stat increases or special abilities. Most other types of items grant stat increases and special abilities relevant to the item type, such as armor bonuses and resistances for armor, movement abilities for boots and almost anything for miscellaneous items.
Two identical items will not stack their powers when equipped by a single unit.
|
Tip
|
2 rings of regeneration will not give better effect than one, but a ring of regeneration and boots of regeneration will stack and yield twice as much regeneration. |
Summoning Items
Summoning items summon creatures to aid the bearer in combat. The summoning occurs either at the beginning of the battle or it occurs every round. Summoning items with constant summons are much rarer than items that only summon creatures at the beginning of combat. The behavior of summoned monsters in combat is described in chapter Combat.
Magic Boosting Items
Magic boosting items increase the spell casting skills of the bearer. Magic boosting items come in two varieties: Generic magic boosters and path boosters. Generic magic boosters increase the bearer’s spell casting level in every magic path by one. Path boosters only increase the spell casting skill for a particular magic path, such as Necromancy or Pyromancy.
Magic Scrolls
Magic scrolls are miscellaneous items with an activated power. They disappear after they are used. Magic Scrolls come in different types, spell scroll, magic maps and teleportation scrolls.
Each spell scroll permanently adds a new spell of the scroll’s level into the user’s spellbook. Certain high level scrolls may also add lower level spells in addition to the high level spell.
Magic maps reveal the current contents of a large part of the world, just like scrying but on a larger scale.
Teleportation scrolls teleports the user and units under him to some location.
Magic Armor
There are two types of magic armor:
Magic armor that grants an armor value
Magic armor that grants a protection bonus
The first of these gives the wearer the designated armor value. If the wearer already has an armor value natively, the better of the two is used.
|
Tip
|
Hydra Skin Armor grants an armor value of 2. A Captain has a native armor value of 1, so the armor value of the armor would be used instead of his native armor value. A High Lord has a native armor value of 3, so the native armor value would be used instead of the Hydra Skin Armor’s value. The High Lord would still benefit from the item’s other properties. |
The Protection bonus value is added to whichever armor the target has, increasing the overall armor value by the amount of the bonus.
|
Tip
|
Our Captain and High Lord from the previous example find a Blacksteel Helmet that provides a protection bonus of +1. If the Captain puts the helmet on while wearing the Hydra Skin, his armor value is raised to 3. Without the Hydra Skin, it would be raised to 2. If instead the High Lord puts the helmet on, his armor value is raised to 4, regardless of whether he wears the Hydra Skin or not. |
Multiple protection bonuses from different items stack, and armor from items also stack with protection bonuses from spells.
Classes
This chapter gives a short description of all the classes in the game. A general overview of things common to the various classes is presented first, with the introductions to the particulars of each class following.
|
Note
|
All of the class introductions in this chapter introduce the classes as they are at the beginning of the game. There may or may not be surprises and possibilities for change later on in the game, but that is left for players to discover on their own. |
Class Powers & Rituals
Most classes have access to special powers and bonuses. Many of the special powers involve magical rituals and the rituals require special resources to perform. Some classes have no access to magical rituals or special powers at all and some of them do not have access at the beginning of the game. Classes that have ritual powers usually have numerous rituals and they only have access to a few of these at the beginning of the game.
More ritual powers can be acquired through Rituals of Mastery.
Rituals of Mastery are divided into three tiers:
Lesser Ritual of Mastery grants the caster knowledge of a new level 1 ritual.
Ritual of Mastery grants the caster knowledge of a new level 2 ritual. If the caster is not of a sufficient level to perform level 2 rituals, it also upgrades him or her to that level (e.g. a Witch’s Apprentice becomes a Witch with this ritual)
Ritual of Grand Mastery grants the caster knowledge of a new level 3 ritual. If the caster is not of a sufficient level to perform level 3 rituals, it also upgrades him or her to that level. Rituals of Grand Mastery often also have additional requirements, such as being only able to be cast in particular locations.
Each casting of a ritual requires at least one Action Point in addition to its special resource cost. Some rituals require more than one AP. Usually every ritual caster starts by knowing one ritual of each level up to the maximum level that they can perform. In other words, apprentices know one level 1 ritual, masters know one ritual each of level 1 and level 2 and grand masters know one ritual of levels 1, 2 and 3.
Resources
Most classes need special resources that most others cannot use. The normal resources are Gold and Iron. These are needed by everyone and often locations that provide one or the other also provide some other special resource.
The special resources that a player collects are determined by what kind of commanders he has. Only resources that one or more of a player’s commanders can use are gathered. If a player does not have a commander required to gather a special resource, he cannot even see what locations would provide that resource and in what quantity.
If a player acquires a commander who can use a special resource normally not accessible to the player’s class, that resource becomes accessible and visible on the map.
|
Tip
|
The Necromancer’s special resource is Hands of Glory and he can gather them from all locations that provide them. The Warlock uses magical gems and can see them, but has no knowledge of or interest in Hands of Glory. If the Necromancer were to acquire a Warlock or a Warlock’s Apprentice in some manner, he would be able to gather gems from that point forward. Conversely, if the Warlock were to gain the services of a Necromancer or a Necromancer’s Apprentice, he would also be able to gather Hands of Glory for the use of his new minion. |
|
Warning
|
If a player loses all commanders who can gather a specific resource, he loses the ability to gather more of that resource until he manages to recruit another commander who can. The resource will disappear from the Treasury list, but the amount gathered to date is not lost. It will become visible and available for use again when a new gatherer is acquired. |
Cold temperature affects the following resources:
Gold          -50%
Fungi         -50%
Herbs         -50%
Weed          -50%
|
Note
|
Mines are unaffected by cold temperature |
Summer        Herbs +100%
Autumn        Fungi +100%
The world map contains many different terrains and structures that the player can move through and/or conquer to add to his domain. Farms, villages, towns, cities, castles, mines and more are there for the taking, though often defended fiercely by their original inhabitants.
Variable Cost Summonings
Some rituals have a variable cost that can be increased or decreased in order to influence the chances of success.
|
Tip
|
The Demonologist can use more or less human sacrifices when trying to summon a demon. The summoning will always succeed, but the control of the demon is dependent on the amount of sacrifices used. |
The start cost at 100% is the most cost effective option. Increasing over 100% will have a reduced effect. A 50% increased cost will have a 33% greater chance of control, and a 100% increased cost will result in a 50% greater chance of control. Decreasing the cost below the normal amount decreases the chance of control by the same amount.
Lifeforce
Lifeforce is a special resource that is only used by the Scourge Lord. It can be extracted from any map tile that is not a desert or a similarly lifeless location.
Special buildings of power are used to accumulate lifeforce from the surrounding terrain. The buildings have different ranges it can absorb from and different maximum amount that it can drain per month. The buildings generate a small amount of lifeforce from the air, regardless of terrain.
| Building | Atmospheric drain | Drain range | Max Lifeforce per month |
|---|---|---|---|
Pillar of Power |
1 |
1 |
15 |
Pyramid of Power |
5 |
2 |
50 |
Mountain of Power |
10 |
3 |
100 |
|
Tip
|
The pillar of power can drain the square surrounding it and will give its owner 15 points of lifeforce per month, unless there are not enough lifeforce rich terrains surrounding it. |
Different terrain tiles contain different amounts of lifeforce that can be drained. Highly populated areas as well as areas with thick vegetation can be drained of large amounts of lifeforce. Squares that are closer to the building of power will be drained more quickly than the areas further away.
| Terrain | Lifeforce drained at range 1 |
|---|---|
Plains |
1 |
Forest |
3 |
Ancient Forest |
10 |
Swamp |
2 |
Hill/Mountain |
0 |
Farm |
2 |
Hamlet |
3 |
Village |
4 |
Town |
5 |
Sea/River |
1/2 |
|
Note
|
Sea and river tiles are special in that they will never run out of lifeforce. |
Inhabited areas that are affected by the lifeforce draining effect will slowly turn the population into ghouls, some of whom will be drawn to the building of power.
Baron
The frontiers of the human realm were defended by landowners known as Barons. Some Barons were warlike and restless. As humankind spread over Elysium and became dominant, these barons tried to usurp their masters' powers and waged war on their neighbors. The large, well-trained forces at their disposal made them formidable foes. They were soon in control of large parts of the human territories. However, not all humans were content with this. The sorcerers of Elysium gathered armies of their own and nonhuman warlords called out for vengeance. The Barons must once again subjugate Elysium.
The Baron has a wide variety of human troops and huge siege engines at his disposal. Knights are formidable units who can inflict additional damage by charging enemies in the initial phase of a battle. Heavy infantry units are strong, but move slowly. Fast cavalry units under the leadership of mounted commanders work as highly mobile forces.
The Baron knows how to keep his subjects in line and can cow peasants into obedience. All farms and villages under the Baron’s rule are required to send a levy of soldiers to the Baron each year. This muster consists of simple spearmen from farms and at least one knight from each village. Large towns and cities do not contribute soldiers. The Baron can also form local militias to defend villages and cities. The larger the settlement, the stronger the militia.
Basic Recruitment:
HP:6  Str:4  Mor:4  MR:4  Armor:0
Spear 1-4
HP:6  Str:4  Mor:4  MR:4  Armor:1
Broadsword 1-6
HP:5  Str:4  Mor:4  MR:4  Armor:0
Crossbow 1-5, range 5, reload 1 round
Dagger 1-3
HP:8  Str:4  Mor:5  MR:4  Armor:2
Broadsword 1-6
HP:5  Str:4  Mor:4  MR:4  Armor:0
Longbow 1-4, range 6
Dagger 1-3
HP:6  Str:4  Mor:4  MR:4  Armor:1
Pike 1-5, range 2
HP:6  Str:4  Mor:4  MR:4  Armor:1
Halberd 1-8
HP:6  Str:4  Mor:4  MR:4  Armor:1
Greatsword 1-9
HP:7  Str:4  Mor:5  MR:4  Armor:1
Crossbow 1-5, range 5, reload 1 round
Broadsword 1-6
HP:10  Str:4  Mor:5  MR:4  Armor:2
Lance Charge 1-10
Broadsword 1-6(+1)
HP:3  Str:4  Mor:3  MR:3  Armor:0
Bite 1-4
HP:10  Str:4  Mor:4  MR:5  Armor:0
Giant Arrow 1-20, range 12, siege, reload 1 round
Giant Arrow 1-20, range 12, reload 3 rounds
Shortsword 1-5
HP:10  Str:4  Mor:4  MR:5  Armor:0
Boulder 1-30, range 16, siege, reload 1 round
Shortsword 1-5
HP:15  Str:4  Mor:4  MR:6  Armor:0
Boulders 1-25, range 20, siege, reload 2 rounds
Shortsword 1-5
Necromancer
Necromancers are sorcerers who are adept at the dark art of Necromancy, the summoning and creation of the living dead. The Necromancer can raise the buried dead or those that have fallen in battle as undead troops to strengthen his army. This practice is forbidden by the gods and Necromancers who are foolish enough to disturb the dead will lose their sanity in the process. Only dead humanoids can be raised as undead and once they are destroyed, they cannot be raised a second time because by that time their bodies are too broken.
The other aspect of Necromancy is the harvest of hands. On stormy nights, darkly robed men collect the left hands of hanged murderers. These are called the Hands of Glory. The burnt flesh of such hands is pleasant to ghosts and evil spirits who can aid the Necromancer in his horrible art. However, the hands can be used in even worse ways. When enough Hands of Glory are burnt, spirits from the darkest realms can be called to instruct the Necromancer how to turn his body into that of a living dead. Some necromancers use the Hands of Glory to rend the veil between worlds to quickly travel through the Underworld.
The Necromancer has very weak troops at the start of the game. It is essential for him to quickly find a battlefield or a graveyard. The ritual of Dark Knowledge is important in this search. The animated dead are weak and they never heal wounds sustained in battle, which makes them unreliable in the long run.
Use the apprentice to animate undead. Otherwise you will go mad and lose the ability to take rational action. Summoned undead require Hands of Glory, which can be found in villages, towns, cities and gallows. The ultimate goal of most necromancers is to transform into a powerful undead creature and live forever! Transforming into a lich will make you immune to insanity and vampires can cure insanity by eating villages.
Basic Recruitment:
HP:6  Str:4  Mor:4  MR:4  Armor:0
Spear 1-4
HP:6  Str:4  Mor:4  MR:4  Armor:1
Broadsword 1-6
HP:5  Str:4  Mor:4  MR:4  Armor:0
Bow 1-3, range 5
Shortsword 1-5
HP:5  Str:4  Mor:4  MR:4  Armor:0
Crossbow 1-5, range 5, reload 1 round
Dagger 1-3
HP:8  Str:4  Mor:5  MR:4  Armor:2
Broadsword 1-6
HP:10  Str:4  Mor:4  MR:5  Armor:0
Boulder 1-30, range 16, siege, reload 1 round
Shortsword 1-5
HP:13  Str:5  Mor:99  MR:1  Armor:0
Spear 1-4(+1)
HP:15  Str:5  Mor:99  MR:1  Armor:2
Broadsword 1-6(+1)
HP:5  Str:4  Mor:99  MR:1  Armor:2
Broadsword 1-6
HP:3  Str:4  Mor:99  MR:1  Armor:0
Bane Fire Bow 1-3, range 5
Fist 1-1
HP:5  Str:4  Mor:99  MR:1  Armor:1
Bane Blade 1-7
Demonologist
The Demonologist is a mage-priest who summons the denizens of the Abyss and the Inferno. The spirits of these realms are powerful and horrible to behold. They crave human flesh and can only be bound to service if they are sated. The greatest of these demons are insatiable and cannot be bound unless the Demonologist is very lucky indeed and the sacrifice is enormous. If the Demonologist fails the binding ritual, the demon will attack and try to devour the weakling human who had the temerity to attempt to rob it of its freedom. Some insane demonologists even try to open gates into the Infernal Realms. Should this happen, the end of the world is near.
The forces at the Demonologist’s disposal are truly powerful. Lesser demons are physically powerful and some of them have magical power the equal of any magic user. Greater demons are even more powerful and the mighty demon lords are practically unequaled in the scope of their magical abilities as well as in physical combat. Many demons use fire to damage their opponents and fire resistant troops in an enemy army may pose a problem for the unwary Demonologist.
Basic Recruitment:
HP:6  Str:4  Mor:4  MR:4  Armor:0
Spear 1-4
HP:6  Str:4  Mor:4  MR:4  Armor:1
Broadsword 1-6
HP:5  Str:4  Mor:4  MR:4  Armor:0
Bow 1-3, range 5
Shortsword 1-5
HP:5  Str:4  Mor:4  MR:4  Armor:0
Crossbow 1-5, range 5, reload 1 round
Dagger 1-3
HP:8  Str:4  Mor:5  MR:4  Armor:2
Broadsword 1-6
HP:10  Str:4  Mor:4  MR:5  Armor:0
Boulder 1-30, range 16, siege, reload 1 round
Shortsword 1-5
Witch
In the ages long before the arrival of man, beings of tremendous power roamed Elysium. These beings were the unchallenged lords of the as yet unnamed realm. In time they tired of exploring the land and melded into the earth to sleep. They slumbered for ages and other beings came to the realm. The sounds and laughter of these new inhabitants disturbed the Sleeping Ones and sometimes one of them woke to punish the newcomers. As a result, the Sleeping Ones came to be feared and worshiped by the people of Elysium. The adherents of this old faith are called Witches and are feared by troll and man alike.
Witches collect fungi from the marshes and forests of Elysium and use them to brew a decoction pleasant to the Old Ones. The smell of the cauldron makes them hungry and reminds their slow minds of the Time Before, when all was quiet and the land was theirs. In rage and hunger the Old Ones and their servants follow the Witch to reclaim their lands from the noisy, shortlived interlopers.
The beings at the Witch’s disposal are physically strong and easy to obtain, but most lack ranged attacks. Archers are a crucial supplement. The Witch’s ability to collect fungi from forests and swamps provides her with excellent scouting capabilities. The more fungi she uses for summoning monsters, the greater the chance of controlling the summoned creature. It is prudent to use plenty of fungi when summoning an Old One, for they are very dangerous if angered.
Basic Recruitment:
HP:6  Str:4  Mor:5  MR:4  Armor:0
Spear 1-4
HP:6  Str:4  Mor:4  MR:4  Armor:0
Poison Bow 1-3, range 5
Dagger 1-3
HP:11  Str:4  Mor:6  MR:4  Armor:1
Lance Charge 1-10
Spear 1-4
Bite 1-6
High Priestess
Long ago in the land of Terra the god Ba’al was incarnated into a physical form and made humans taste fear and destruction. The moon turned red as blood and severe heat, drought and famine struck. Giants walked the earth and feasted on the flesh of humans. To placate this horrifying god, men began to sacrifice their fellow men in rites of blood. This pleased the Dark God, who consumed the souls of the sacrificial victims. Ba’al withdrew back into the world from whence he came and feasted upon slaughtered souls. But the giants remained. Ever since, mortals have worshiped the abominable God and sacrificed their own kind to him. From time to time Ba’al has even honored the prayers and sacrifices of his devotees by his very presence.
When the Voice of El came to Terra and called out to the poor and the famished, Ba’al sent his subjects to war against him. The Children of El were hunted down and exterminated and fled to the promised land of Elysium. Ba’al’s interest and hunger was aroused and a High Priestess was sent to hunt down and eradicate the heretics until the entire land of Elysium kneels before the glory of Ba’al Revealed and spills the blood of men in devotion.
The High Priestess of Ba’al performs ritual sacrifices in order to please her God and be rewarded by his favor. The giants and servants of Ba’al, whose service she can receive in return for a large sacrifice, can be nearly as powerful as demons and need not be controlled, for they are loyal to their Dark God even if it means serving a mere mortal. This makes the High Priestess a very powerful and reliable contender for the throne of Elysium. The greatest ritual the High Priestess can perform is to sacrifice her own body so that Ba’al can use it to enter Elysium in all his terrible splendor.
Basic Recruitment:
HP:6  Str:4  Mor:5  MR:4  Armor:0
Javelin 1-4, range 3
Spear 1-4
HP:5  Str:4  Mor:5  MR:4  Armor:0
Bow 1-3, range 5
Dagger 1-3
HP:7  Str:4  Mor:6  MR:5  Armor:1
Broadsword 1-6
HP:10  Str:4  Mor:5  MR:4  Armor:2
Broadsword 1-6
HP:10  Str:4  Mor:4  MR:5  Armor:0
Boulder 1-30, range 16, siege, reload 1 round
Shortsword 1-5
Bakemono
The Bakemono were once slaves of the Oni, demons from the Netherworld of Bakemono legend. The entrance to this Realm was on the top of a great mountain that the Oni made their fortress and where they enslaved the Bakemono. When the gate to the Realm of the Oni was closed through trickery and the last of the Oni kings died, the Bakemono took over the mountain fortress of their masters and set out to carve a kingdom of their own and to make slaves of all lesser creatures.
The Bakemono live in a tribal society ruled by the most powerful of their kind. Usually this is a Bakemono Sorcerer, a powerful spellcaster who is rightfully feared by most others. Powerful Bakemono Sorcerers have been known to make themselves immune to death by hiding their hearts away in secret places.
Bakemono Sorcerers can perform blood sacrifices in order to summon Oni demons and spirits of the wilderness to their aid. The greater the sacrifice, the greater the chance that the being will serve the Bakemono Sorcerer. The summoning can also be performed without any sacrifices, but this will anger the spirit or demon being summoned and the more powerful demons should not be trifled with.
Basic Recruitment:
HP:3  Str:3  Mor:4  MR:3  Armor:1
Spear 1-4(-1)
HP:3  Str:3  Mor:4  MR:3  Armor:1
Bow 1-3(-1), range 5
Dagger 1-3(-1)
HP:4  Str:3  Mor:4  MR:3  Armor:1
Shortsword 1-5(-1)
Barbarian
Since ancient times, Barbarian hordes have plundered the lands of Elysium. Of unknown origin, their sudden arrival at the fringes of civilization sends tremors throughout the realms. Some speculate that they hail from small villages in secluded regions while others say they come from the Netherworld. The Barbarian threat is always present and only with a united show of force can the tide be turned.
Barbarians are physically more powerful than normal men, but they are also more vulnerable to magic. The Barbarian Warlord cannot buy advanced weapons like siege engines, but may sometimes recruit werebears or the fierce warriors of the amazon tribes and their magic wielding leaders. Werebears look just like ordinary Barbarians until they reveal themselves in combat, where their strength and rage make them far more powerful than a common Barbarian warrior. Barbarians also have access to Spirit Guides who use magical herbs to contact ancestral spirits and summon them to join the armies of Barbarians again. More powerful Spirit Guides are called Enaries.
Basic Recruitment:
HP:7  Str:5  Mor:5  MR:3  Armor:0
Axe 1-7(+1)
HP:6  Str:4  Mor:4  MR:3  Armor:0
Bow 1-3, range 5
Dagger 1-3
HP:7  Str:5  Mor:5  MR:3  Armor:1
Broadsword 1-6(+1)
HP:10  Str:5  Mor:5  MR:3  Armor:0
Bow 1-3, range 5
Spear 1-4(+1)
HP:10  Str:5  Mor:5  MR:3  Armor:1
Lance Charge 1-10
Spear 1-4(+1)
HP:14  Str:6  Mor:6  MR:3  Armor:0
Great Maul 1-8(+3)
Great Maul 1-8(+3)
Senator
During the rise of the Empire, new tactics and troops were developed to crush human dissidents and eliminate the Barbarian threat. These tactics gave birth to the soldiers called legionnaires who were usually equipped with large shields and javelins. Newly recruited legionnaires were placed next to veterans to learn the art of war. This system was very effective against the humans the legions were supposed to fight, but its success against other forces present in Elysium has been more varied.
The legionnaire is a formidable soldier by human standards. Their large shield is more effective than most shields found in Elysium and the javelin can be used from a distance, which is very effective for large squads of legionnaires. The well-disciplined legionnaires can use simple wooden watch towers as citadels in addition to the sturdy stone guard towers used by all other warlords.
The Senator can sometimes buy gladiators or net-wielding retiarii to supplement his legions. Besides the ordinary wizards who may take service with any warlord, the Senator may hire Augurs, priest-diviners of the Empire. Sometimes followers of the various esoteric cults extant in the Empire can also make their services available to bolster the Senator’s forces.
All senators are of noble birth and battle for positions of political influence. Being a senator leaves only one political position left to acquire: Emperor. A Senator who is able to bribe or assassinate his way through the competition can replace the current Emperor and hold a great coronation ceremony held in the capital. But being the Emperor is just the beginning of the Senator’s divine aspirations.
Basic Recruitment:
HP:5  Str:4  Mor:3  MR:4  Armor:0
Javelin 1-4, range 3
Spear 1-4
HP:7  Str:4  Mor:4  MR:4  Armor:1
Javelin 1-4, range 3
Shortsword 1-5
HP:8  Str:5  Mor:5  MR:4  Armor:1
Javelin 1-4, range 3
Shortsword 1-5(+1)
HP:9  Str:5  Mor:6  MR:4  Armor:2
Pike 1-5, range 2
HP:10  Str:4  Mor:4  MR:5  Armor:0
Giant Arrow 1-20, range 12, siege, reload 1 round
Giant Arrow 1-20, range 12, reload 3 rounds
Shortsword 1-5
HP:8  Str:5  Mor:5  MR:4  Armor:1
Javelin 1-4, range 3
Shortsword 1-5(+1)
Pale One
A strange race of one-eyed creatures has evolved in the dark caverns under Elysium. Untouched by the sun, they have become known to humans as the Pale Ones. They dwell in cavernous, intricately carved halls in the depths of the earth. The Pale Ones have gills and also inhabit underground lakes and rivers. Their large single eye has very good night vision and can see well in dark caverns where the only glimmer of light comes from the luminous mushrooms growing there. However, in daylight their vision is abysmal by human standards, the sensitive eyes accustomed to pitch darkness blinded by bright sunlight. Pale Ones never stop growing and ancient ones can be of enormous proportions.
The wisest of the ancient ones are the Oracles, priest-mages of great power. The Oracles gather magical gems found beneath the earth and use them to divine the future and to summon allies in times of war. The leader of the Pale Ones is called the King of the Deep. He is a very old and therefore also a very large Pale One.
Basic Recruitment:
HP:10  Str:5  Mor:4  MR:5  Armor:0
Throw Rock 1-1(+1), range 2
Spear 1-4(+1)
HP:10  Str:5  Mor:4  MR:5  Armor:0
Sling 1-2, range 4
Dagger 1-3(+1)
HP:10  Str:5  Mor:4  MR:5  Armor:1
Spear 1-4(+1)
HP:12  Str:5  Mor:5  MR:5  Armor:2
Halberd 1-8(+1)
Druid
The Druids like to portray themselves as priests of nature and the saviors of Elysium. Most do not agree with this description, but what is certain is that they have found a way to coerce the beasts of Elysium to do their bidding. However, meddling with the forces of nature is dangerous and it is only a matter of time before the Druid is lured into helping the beasts in their war against humankind. When such beasts attack human settlements, they are backed by the power of the Druid. Helping the beasts is surely an act of evil, but no one can deny that leading the animals is a great feat of magic as the beasts of Elysium have strong souls and are not easily swayed.
Influencing nature requires collecting magical herbs and using them in mystic rituals. Ultimately the Druid may even win the support of powerful beings of legend that can only be contacted through communion with the most ancient forests where the Soul of the Wild runs deep. Most beasts are stronger than humans, but they are usually lacking in ranged attacks and siege abilities.
Basic Recruitment:
HP:5  Str:4  Mor:4  MR:4  Armor:0
Javelin 1-4, range 3
Spear 1-4
HP:5  Str:4  Mor:4  MR:4  Armor:0
Sling 1-2, range 4
Dagger 1-3
HP:5  Str:4  Mor:5  MR:4  Armor:0
Broadsword 1-6(+1)
HP:10  Str:4  Mor:5  MR:4  Armor:1
Javelin 1-4, range 3
Broadsword 1-6
HP:5  Str:4  Mor:5  MR:4  Armor:0
Carnyx Horn special, range 3
Fist 1-1
Burgmeister
The Hoburghers are a race of honest and well organized halfmen. They are famous for their skill in farming, their skill in manipulating iron and of course the best beer in Elysium. The wealthiest of the Hoburghers is the Burgmeister who is at the top of the hierarchy and leads the entire Hoburgher society. Hoburghers live in fortified settlements called Hoburgs in which they usually spend all their time as long as they are not farming or hunting. Other noteworthy Hoburghers are the Horticulturist, who most importantly holds the secret of crafting perfect beer, and the Horologist, who is capable of building wondrous beings powered by clockwork mechanisms.
Though generally a peaceful and gentle people, the Hoburghers have a well developed military. They know that fighting is necessary to defend their villages and to secure new resources for their constructs or get more land for farming. Crossbows play a very prominent role in the Hoburgher army, because they enable the Hoburghers to deliver serious damage even to much larger enemies despite their small size.
As a Burgmeister it is important to conquer mines. Mines yield iron, which is necessary to equip higher quality troops. They also produce gems imbued with the powers of the Elements for the Horologist to use. The Burgmeister and the Horticulturist are able to convert regular farms to Hoburg villages for added income and increased production of the enchanted weed.
Basic Recruitment:
HP:2  Str:2  Mor:3  MR:6  Armor:0
Staff 1-3(-1)
HP:2  Str:2  Mor:3  MR:6  Armor:0
Sling 1-2(-1), range 4
Dagger 1-3(-1)
HP:2  Str:2  Mor:3  MR:6  Armor:0
Crossbow 1-5(-1), range 5, reload 1 round
Dagger 1-3(-2)
HP:3  Str:2  Mor:3  MR:6  Armor:1
Spear 1-4(-1)
HP:3  Str:3  Mor:4  MR:6  Armor:1
Shortsword 1-5(-1)
HP:3  Str:2  Mor:4  MR:6  Armor:2
Pike 1-5(-1), range 2
HP:4  Str:3  Mor:5  MR:6  Armor:2
Shortsword 1-5(-1)
HP:5  Str:3  Mor:5  MR:6  Armor:2
Lance Charge 1-8
Shortsword 1-5(-1)
Gore 1-4
HP:10  Str:4  Mor:4  MR:5  Armor:0
Boulder 1-30, range 16, siege, reload 1 round
Shortsword 1-5
Warlock
Warlocks were among the first humans to arrive in Elysium. They discovered Elemental power trapped in the gems found deep in the mountains of the land. By freeing this power, the Warlock can create or attract Elemental spirits to serve him. Rubies contain the blazing power of Fire, diamonds the turbulent power of Air and winds, sapphires the mercurial power of Water and emeralds the enduring power of Earth. When the energies of a large number of gems are released, more powerful feats can be performed.
The Warlock can call upon a number of very strong and powerful beings to serve him. The Kings and Queens of the Elements are almost as powerful as demon lords and can summon and command lesser Elemental beings. Greater Elemental beings are strong, but often lacking in magical abilities.
Basic Recruitment:
HP:6  Str:4  Mor:4  MR:4  Armor:0
Spear 1-4
HP:6  Str:4  Mor:4  MR:4  Armor:1
Broadsword 1-6
HP:5  Str:4  Mor:4  MR:4  Armor:0
Bow 1-3, range 5
Shortsword 1-5
HP:5  Str:4  Mor:4  MR:4  Armor:0
Crossbow 1-5, range 5, reload 1 round
Dagger 1-3
HP:8  Str:4  Mor:5  MR:4  Armor:2
Broadsword 1-6
HP:10  Str:4  Mor:4  MR:5  Armor:0
Boulder 1-30, range 16, siege, reload 1 round
Shortsword 1-5
Priest King
The Priest Kings of Aztlan have only recently discovered Elysium and arrived there to acquire more slaves and sacrifices for the worship of their six bloodthirsty Gods, the Teotl. Before the discovery of Elysium, the tribes of Aztlan had lived in isolation from other cultures and had not discovered the secrets of metal working, which has resulted in a technologically inferior culture when compared to the other nations found in Elysium. The soldiers of Aztlan use archaic weapons that will undoubtedly have trouble penetrating the armor of modern knights and other heavily armed troops.
The Tribal Kings who serve the Priest King use slaves to form the sword fodder of their armies. Slaves are taken from towns and larger villages and can be very useful against smaller armies despite their low morale and lack of proper equipment. Sacred warriors who serve the temples of the Gods are better equipped and benefit from the blessing of the god, making them more powerful in combat if the Gods hold them in favor.
The Priest King and his fellow Priests who serve the Six Teotl Gods can perform blood sacrifices to gain favors for their sacred warriors or summon creatures beloved of their bloodthirsty masters. These beings are often sacred, which means that they enjoy their god’s protection and gain more powers when more blood is sacrificed.
The Priests of the six Teotl each have Invocations of power to aid them and their followers in battle. The nature of these Invocations is tied to each Teotl’s sphere of influence. Priest Kings serve the Teotl of War and the Sun and can call on the fiery gaze of the sun to burn their enemies.
Basic Recruitment:
HP:4  Str:4  Mor:4  MR:4  Armor:0
Sling 1-2, range 4
Spear 1-4
HP:5  Str:4  Mor:4  MR:4  Armor:0
Spear 1-4
HP:6  Str:4  Mor:4  MR:4  Armor:0
Javelin 1-4, range 3
Mace 1-5
Troll King
The Troll King is the most physically powerful warlord of all, capable of conquering entire towns on his own. His hide is very tough, making him almost immune to attacks from weaker beings like Hoburgs or poorly armed humans. Should the Troll King be wounded, his powers of regeneration allow him to heal at an extraordinary rate during battle just like his main companions, the trolls. All trolls have very keen noses and can detect stealthy units like brigands without trouble.
The Troll King’s mother is a very old and magically proficient crone. She and the goblin shamans under her tutelage can use fungi to perform magic rituals. She can also turn ordinary forests into troll forests where the plants and trees themselves will attack anyone foolish enough to enter the woods. Those who die in troll forests become animated by plants and tree roots and these carrion beasts will wander about and kill anything that gets in their way.
Basic Recruitment:
HP:2  Str:3  Mor:3  MR:3  Armor:0
Club 1-3(-1)
HP:22  Str:7  Mor:5  MR:3  Armor:0
Great Club 1-7(+8)
Enchanter
The Enchanter has learned the art of making constructs. These constructs are mago-mechanical creations, partly magical, partly mechanical. There are many types of constructs, such as living statues, animated armor and weapons and great golems. The constructs are often huge and can withstand massive amounts of damage before being destroyed. With the help of these enchanted, mechanical giants the Enchanter can crush even the mightiest of armies. However, these titans are extremely expensive to build, requiring entire mines to construct. Lesser constructs are not as costly and are more commonly used when building armies.
The Enchanter will have troops with enormous hit points. Since it costs vast amounts of money to build these constructs, the enchanter often lacks the funds to pay for regular troops. However, even a few golems can crush powerful armies. Constructs do not heal damage suffered in combat, but they have many and varied abilities, making them very powerful.
Basic Recruitment:
HP:6  Str:4  Mor:4  MR:4  Armor:0
Spear 1-4
HP:6  Str:4  Mor:4  MR:4  Armor:1
Broadsword 1-6
HP:5  Str:4  Mor:4  MR:4  Armor:0
Bow 1-3, range 5
Shortsword 1-5
HP:5  Str:4  Mor:4  MR:4  Armor:0
Crossbow 1-5, range 5, reload 1 round
Dagger 1-3
HP:8  Str:4  Mor:5  MR:4  Armor:2
Broadsword 1-6
HP:10  Str:4  Mor:4  MR:5  Armor:0
Boulder 1-30, range 16, siege, reload 1 round
Shortsword 1-5
High Cultist
The High Cultist is the leader of an entire town of worshipers dedicated to the Great Old Ones. However, regular human sacrifices to weed out the unworthy have left the town with only a small but highly dedicated population. There is a special sea water well in the town where women are encouraged to submerge themselves in the hope of being impregnated by a Great Old One. This never happens, but many women find themselves taken by a Deep One instead. The offspring of such a union will be a hideous fish-like humanoid instead of the noble Starchild everyone hopes for. These half-human hybrids are highly devoted to the cause and will help the cultists spread the influence of the Great Old Ones. The cultists build similar sea water wells in all coastal settlements they conquer and subject the population to their rites, thus gaining the services of the resulting hybrids as soldiers for the High Cultist’s armies or as a defensive force for the settlement.
The High Cultist needs to conquer more settlements to gain sacrifices. They are needed to summon Deep Ones from the depths of the sea and convince them to support the High Cultist’s cause. Summoning rituals are always risky and a successful cultist never summons anything that he cannot also kill if things go awry.
Even though his service to the Great Old Ones has changed him, the High Cultist is ultimately human by nature and unable to grasp that which is required to perform the most difficult rituals. To gain access to such magic, the High Cultist must summon an Old One to continue into the realms where he himself cannot go. Starspawn can use astrology to divine the location of enemies and to open pathways for powerful Horrors to attack them. The Queen of the Deep is an Old One who can summon entire armies from the deep.
Basic Recruitment:
HP:6  Str:4  Mor:4  MR:4  Armor:0
Spear 1-4
HP:6  Str:4  Mor:4  MR:4  Armor:1
Broadsword 1-6
HP:5  Str:4  Mor:4  MR:4  Armor:0
Bow 1-3, range 5
Shortsword 1-5
HP:5  Str:4  Mor:4  MR:4  Armor:0
Crossbow 1-5, range 5, reload 1 round
Dagger 1-3
HP:8  Str:4  Mor:5  MR:4  Armor:2
Broadsword 1-6
HP:10  Str:4  Mor:4  MR:5  Armor:0
Boulder 1-30, range 16, siege, reload 1 round
Shortsword 1-5
Dwarf Queen
The dwarves of Elysium live in mines, preferably deep inside the tunnels delved into the mountains. Although they have good trade relations with humans, they rarely let any outsider enter the dwarven cities. Most dwarves are suspicious of the outside world itself and prefer to stay under the mountain as much as possible. However, sometimes dwarves must leave the safety of the mines in order to trade with humans and to locate new mountains suitable for mining.
At the top of dwarven society is the Queen, or Dvala, as she is called among the dwarves. She is the only female dwarf in a mine and her task is mainly to give birth to more dwarves. The birthing of new dwarf workers occupies almost all of her time and thus the actual ruling of the mine is done by a council of elders, which consists of the oldest dwarves and the oldest Rune Smith.
Rune Smiths and Councilors are highly esteemed dwarves. The Rune Smiths create the magical equipment used by the dwarven elite guards and warriors. The councilors have the honor of establishing new colonies by performing the secret rites that bring a new Dvala to an empty mine.
Dwarves are excellent miners and can extract twice the normal amount of gold and iron from mines. On the other hand, they are not very good at administering human settlements or castles and receive reduced income from anything that isn’t a mine.
Basic Recruitment:
HP:5  Str:4  Mor:4  MR:5  Armor:2
Axe 1-7
HP:6  Str:4  Mor:5  MR:5  Armor:2
Battle Axe 1-8
HP:8  Str:4  Mor:5  MR:5  Armor:2
Shortsword 1-5
HP:5  Str:4  Mor:4  MR:5  Armor:1
Arbalest 1-10, range 7, reload 2 rounds
Dagger 1-3
HP:5  Str:4  Mor:4  MR:5  Armor:1
Crossbow 1-5, range 5, reload 1 round
Axe 1-7
HP:5  Str:4  Mor:4  MR:5  Armor:2
Crossbow 1-5, range 5, reload 1 round
Pick Axe 1-7
HP:10  Str:4  Mor:4  MR:5  Armor:0
Giant Arrow 1-22, range 12, siege, reload 1 round
Giant Arrow 1-22, range 12, reload 3 rounds
Shortsword 1-5
HP:13  Str:5  Mor:6  MR:5  Armor:2
Shortsword 1-5(+2)
Voice of El
The Voice of El is an Arch Bishop who is charged with the conversion of Elysium to the proper faith. El should be worshiped at least in all human settlements and everyone shall pay a tithe to the Church. The tithe is distributed yearly among the highest ranking priests. A Cardinal will gain twice the share of an Arch Bishop, a normal Bishop has no right to any tithe and if a Pontiff has been appointed, he will collect the entire tithe to distribute as he sees fit. Because the Church in the new world has large expenses, the tithe is taken thrice in Elysium, meaning that all converted settlements pay a third of their income to the Church. Only the most high ranking priest for each Voice of El counts when the tithe is shared.
The priests of El collect relics to enable them to serve El better. The relics can be used either toward breaking the Seven Seals or to sacrifice them to El in order to gain more favor. There are seven Seals that separate El from the world and they prevent him from punishing the heretics of Elysium in an effective manner. After the breaking of at least one Seal, minions of El will come to assist His church. The breaking of more Seals will bring forth more powerful minions and breaking all Seven Seals will unleash the Apocalypse.
Basic Recruitment:
HP:6  Str:4  Mor:4  MR:4  Armor:0
Spear 1-4
HP:6  Str:4  Mor:4  MR:4  Armor:1
Broadsword 1-6
HP:5  Str:4  Mor:4  MR:4  Armor:0
Bow 1-3, range 5
Shortsword 1-5
HP:6  Str:4  Mor:4  MR:4  Armor:1
Pike 1-5, range 2
HP:6  Str:4  Mor:4  MR:4  Armor:1
Halberd 1-8
HP:10  Str:4  Mor:4  MR:5  Armor:0
Boulder 1-30, range 16, siege, reload 1 round
Shortsword 1-5
Illusionist
Illusionists are masters of deception and misdirection. Through their arcane study of light, sound and the senses, they have perfected a magic that is designed to confound sight, hearing, smell, taste and even touch. The Crystal Palace of an Illusionist is a place where mirrored walls cast reflection upon reflection upon reflection in an infinite maze of illusion that leaves the unprepared visitor dazzled and disoriented. In an Illusionist’s domain, the border between the real and the unreal is crossed as casually as a peasant crosses his field. One never knows whether the things he sees are real or simply figments of his own (or someone else’s) imagination. The conjurations of an Illusionist are fragile, instantly dispelled when confronted with hard reality. Yet despite their ephemeral nature, they have a very real power to affect living things. That which is seen and believed will have a physical effect upon those who do not realize they are dealing with the unreal and illusionary blades will inflict real, bleeding wounds on their bodies.
Illusionists can use the power of magical gems to store both their spells and illusions in specially constructed mirrors, which will then release the stored contents in battle. Many a warlord has laughed derisively at a small opposing force whose vain commander brings large, fragile mirrors to the field of battle. Most of those warlords have then had to watch in frustration and disbelief as their own ordered ranks turn into a chaotic, snarled mess, their soldiers distracted and confused by bright lights, frightened by visions only they can see and cut down and trampled into the ground by soldiers and fantastical monsters that marched forth from the enchanted mirrors. Those facing an Illusionist are advised to underestimate him at their own peril.
Basic Recruitment:
HP:6  Str:4  Mor:4  MR:4  Armor:0
Spear 1-4
HP:6  Str:4  Mor:4  MR:4  Armor:1
Broadsword 1-6
HP:5  Str:4  Mor:4  MR:4  Armor:0
Bow 1-3, range 5
Shortsword 1-5
HP:5  Str:4  Mor:4  MR:4  Armor:0
Crossbow 1-5, range 5, reload 1 round
Dagger 1-3
HP:8  Str:4  Mor:5  MR:4  Armor:2
Broadsword 1-6
HP:10  Str:4  Mor:4  MR:5  Armor:0
Boulder 1-30, range 16, siege, reload 1 round
Shortsword 1-5
HP:1 Str:1 Mor:99 MR:10 Armor:1
HP:2 Str:1 Mor:99 MR:10 Armor:2
HP:6 Str:1 Mor:99 MR:10 Armor:3
HP:20 Str:1 Mor:99 MR:10 Armor:3
Markgraf
The first Markgraf was once one of the richest persons in a Hoburg, but he was bested to the title of Burgmeister. The Markgraf then decided to withdraw himself from the Hoburgher society altogether, setting up his domain as that of a Graf, modeled on the human Barons. For a few generations, this remote area of the Hoburgher society was more or less self-sufficient, if a bit leaner than their neighbors. The Markgraf managed to live well off of his subjects and no renegades survived to tell the tale. Many Hoburghers of ill repute have found a refuge in the towns of the Markgrafdom as they had already broken with the customs of mainstream Hoburgher society. As the Markgraf’s domains are more barren and worn down than the rest the Hoburg lands, the Markgrafs have tried every means available to improve the lot of their subject and themselves.
The subjects of the Markgraf are a quiet and suspicious people. Strangers who come to visit will find that the doors are closed and no one will speak to them in the tavern. One of the more noteworthy subjects of the Markgraf is the Nekromant, a Hoburgher with an affinity for the necromantic arts. The Markgraf has seen the potential of using necromancy and put him to work on all kinds of projects.
Nekromants collect the left hands of dead criminals that can be found in towns and large villages. These hands are called Hands of Glory and contain power that can be used in necromantic rituals. The Nekromants can raise the dead to create armies, but risk their sanity in the process. However, the most important task for a Nekromant is to ensure eternal life for the Markgraf by transforming him into a vampire.
Basic Recruitment:
HP:2  Str:2  Mor:3  MR:6  Armor:0
Staff 1-3(-1)
HP:2  Str:2  Mor:3  MR:6  Armor:0
Sling 1-2(-1), range 4
Dagger 1-3(-1)
HP:2  Str:2  Mor:3  MR:6  Armor:0
Crossbow 1-5(-1), range 5, reload 1 round
Dagger 1-3(-2)
HP:3  Str:2  Mor:3  MR:6  Armor:1
Spear 1-4(-1)
HP:3  Str:3  Mor:4  MR:6  Armor:1
Shortsword 1-5(-1)
HP:3  Str:2  Mor:4  MR:6  Armor:2
Lucerne Hammer 1-7(-1)
HP:3  Str:2  Mor:4  MR:6  Armor:2
Pike 1-5(-1), range 2
HP:4  Str:3  Mor:5  MR:6  Armor:2
Shortsword 1-5(-1)
HP:5  Str:3  Mor:5  MR:6  Armor:1
Lance Charge 1-6
Shortsword 1-5(-1)
Gore 1-4
HP:4  Str:3  Mor:99  MR:1  Armor:1
Spear 1-4
HP:4  Str:3  Mor:99  MR:1  Armor:2
Shortsword 1-5
HP:1  Str:2  Mor:99  MR:1  Armor:0
Bane Fire Crossbow 1-5(-1), range 5, reload 1 round
Fist 1-1
HP:10  Str:4  Mor:4  MR:5  Armor:0
Boulder 1-30, range 16, siege, reload 1 round
Shortsword 1-5
Dryad Queen
In the wild forests of Elysium strange half-men roam. Since time immemorial they have lived untamed and free. But when man came to Elysium the old ways changed. The wild half-men were exposed to the gifts of civilization and some of them embraced this new order. Centaurs, once wild and quarrelsome, are now heralds of civilization and try to impose a culture not theirs on their brethren. Scripture, metal working and less useful traits of human culture have diluted the ancient ways of the half-men. Now the Queen of the Wild, a Dryad priestess of remarkable power is gathering her flock, regardless of the wishes of the Centaur Sages, to expel the humans and make Elysium what it once was, beautiful and untamed.
In the sacred groves of Gaia wild half-men appear. They are wild and undisciplined, but they can be armed and trained to fight in an orderly fashion. Most of them are prone to go berserk and centaurs often abandon their bows to fight in melee if wounded. If brought to a castle, citadel or city the wild ones can be educated and equipped with armaments of human manufacture. Thus it is important for the half-men to ensure a steady income of iron and gold. Still, most of the armies of the Dryad Queen is comprised of animals and wild half-men barely able to tell one end of a spear from the other.
Basic Recruitment:
HP:21  Str:6  Mor:5  MR:5  Armor:1
Spear 1-4(+2)
Hoof 1-4
HP:19  Str:6  Mor:5  MR:5  Armor:1
Javelin 1-4(+1), range 3
Spear 1-4(+1)
Hoof 1-4
HP:8  Str:4  Mor:5  MR:5  Armor:0
Javelin 1-4, range 3
Spear 1-4
Hoof 1-3
HP:8  Str:4  Mor:5  MR:5  Armor:0
Spear 1-4
Hoof 1-3
HP:29  Str:7  Mor:6  MR:4  Armor:1
Battle Axe 1-8(+9)
Gore 1-8
Scourge Lord
The Scourge Lord is the undisputed ruler of the land, as it is he who determines which people should be allowed to live and which should be drained of their life to fuel the Scourge Lord’s power. The Scourge Lords is able to grant great power to his foremost servants. These servants are called Heralds and they enforce the Scourge Lord’s laws and expand his influence by conquering neighboring areas.
For lesser spells the Scourge Lord and his Herald can drain life force from vegetation or living beings in the immediate surroundings. But for powerful rituals, much more life force is needed, and for this purpose great pillars or pyramids are built that can extract life force from the surrounding lands. Anything in the vicinity of such a site of power will soon be turned into barren wastelands as the very life is drained from the land. Some living beings from such areas will be turned into Ghouls and continue to serve the Scourge Lord, but most will simply die as their life force is stolen.
These rituals of the Scourge Lord are very powerful and can be used to summon and control beasts, teleport entire armies or to further enhance the might of the Scourge Lord and his Heralds. The Scourge Lord will not share power and there can only be one master. Only if the Lord becomes a King will he allow his Heralds to advance in power and become Scourge Lords.
Basic Recruitment:
HP:6  Str:4  Mor:4  MR:4  Armor:0
Spear 1-4
HP:6  Str:4  Mor:4  MR:4  Armor:1
Broadsword 1-6
HP:5  Str:4  Mor:4  MR:4  Armor:0
Bow 1-3, range 5
Shortsword 1-5
HP:5  Str:4  Mor:4  MR:4  Armor:0
Crossbow 1-5, range 5, reload 1 round
Dagger 1-3
HP:8  Str:4  Mor:5  MR:4  Armor:2
Broadsword 1-6
HP:10  Str:4  Mor:4  MR:5  Armor:0
Boulder 1-30, range 16, siege, reload 1 round
Shortsword 1-5
HP:5  Str:4  Mor:4  MR:4  Armor:0
Bow 1-3, range 5
Broadsword 1-6
HP:9  Str:4  Mor:4  MR:3  Armor:0
Bow 1-3, range 5
Broadsword 1-6(+1)
HP:10  Str:4  Mor:4  MR:5  Armor:0
Boulder 1-30, range 16, siege, reload 1 round
Shortsword 1-5
Cloud Lord
The Cloud Lord is the ruler of the Airya, winged humanoids living on solid clouds far above the lands of Elysium. The Airya craft armors and weapons from magical gems and their forces are both swift and deadly. From his lofty abode the Cloud Lord has observed kingdoms rise and fall in Elysium. Now he has decided to rid the lands of incompetent and malicious rulers.
The Cloud Lord can easily be mistaken for a Warlock of the Air, but where the warlock forms a pact with his chosen element, the Cloud Lord commands the beings of the sky through sheer magical power. Birds, elementals and mythical beasts of the skies are his to command as well as giants of thunder and frost; and even the elemental queens might come to his aid if properly called.
Basic Recruitment:
HP:5  Str:4  Mor:4  MR:5  Armor:0
Ice Lance 1-4
HP:4  Str:4  Mor:4  MR:5  Armor:0
Bow 1-3, range 5
Shortsword 1-5
HP:5  Str:4  Mor:4  MR:5  Armor:1
Ice Blade 1-6
HP:6  Str:4  Mor:5  MR:5  Armor:2
Ice Lance 1-4
HP:7  Str:5  Mor:6  MR:6  Armor:1
Dawn Blade 1-6
HP:7  Str:5  Mor:6  MR:6  Armor:2
Shortsword 1-5
Dagger 1-3
HP:10  Str:4  Mor:4  MR:5  Armor:0
Boulder 1-30, range 16, siege, reload 1 round
Shortsword 1-5
Kobold King
Kobolds are small humanoid reptilians that claim draconic ancestry. They thrive in mines and caverns where they build hatcheries and reproduce at a prodigious rate. A Kobold Hatchery will soon flood the countryside with swarming kobolds. Sometimes a Kobold Shaman will establish a stronghold in a hatchery, improving both the defenses and the rate at which eggs are hatched. If a Kobold Prophet or Kobold King would emerge, the power to harness the magic of gems in incubating eggs is further increased and winged elite kobolds known as Dragon Spawn will be available.
Kobolds come in five colors, four of which are affiliated with the powers of a specific gemstone. Red Kobolds are affiliated with the magic of rubies and will create their hatcheries where the fiery power of rubies will enhance and incubate their eggs. All red kobolds are resistant to fire and flames and their shamans bring fiery magic to the battlefield. Green Kobolds gain their powers from emeralds, are resistant to poison, and use poison in combat. Blue Kobolds are affiliated with the icy magic of sapphires. They are resistant to cold and can hide and move unhindered in cold climates. Their shamans use frost magic. White Kobolds are affiliated with the thunderous powers of diamonds. Many white kobolds are gifted with wings and are able to fly. Finally there are the Black Kobolds. Rare and enigmatic they do not found hatcheries as do the other kobolds. They can draw power from all kinds of gems, but at a higher cost. Black Kobolds are masters at stealth and they serve as scouts, murderers and dark mages.
Basic Recruitment:
HP:2  Str:2  Mor:2  MR:5  Armor:1
Spear 1-4(-1)
HP:2  Str:2  Mor:2  MR:5  Armor:1
Sling 1-2(-1), range 4
Claw 1-1
HP:2  Str:2  Mor:2  MR:5  Armor:1
Spear 1-4(-1)
HP:2  Str:2  Mor:2  MR:5  Armor:1
Small Poison Bow 1-3(-1), range 4
Claw 1-1
HP:2  Str:2  Mor:2  MR:5  Armor:1
Spear 1-4(-1)
HP:2  Str:2  Mor:2  MR:5  Armor:1
Sling 1-2(-1), range 4
Claw 1-1
HP:2  Str:2  Mor:2  MR:5  Armor:1
Spear 1-4(-1)
HP:2  Str:2  Mor:2  MR:5  Armor:1
Bow 1-3(-1), range 5
Claw 1-1
Monkey Maharaja
In the jungles of southern Elysimum lives strange breeds of monkey-men gifted with cunning and wisdom far beyond that of ordinary beasts. These monkeys have formed a society where size and strength determins your caste and position in society. Lowest of the low, the markatas are barely more than cunning monkeys. Above them comes the Vanara, monkeys of almost human stature. At the top of society are the Bandar, large and warlike brutes that has dominated their lesser kin for times immemorial. Living apart and in some ways above the other monkeys are the White Ones, white-furred vanaras gifted with profound wisdom and knowledge. The monkey-people are ruled by a Maharaja, a Bandar ape of outstanding stature.
Basic Recruitment:
HP:2  Str:2  Mor:2  MR:2  Armor:0
Mace 1-5(-2)
HP:2  Str:2  Mor:2  MR:2  Armor:0
Bow 1-3(-2), range 5
Bite 1-2
HP:5  Str:4  Mor:3  MR:3  Armor:0
Bow 1-3, range 5
Dagger 1-3
HP:6  Str:4  Mor:3  MR:3  Armor:0
Mace 1-5
HP:5  Str:4  Mor:4  MR:3  Armor:1
Bow 1-3, range 5
Mace 1-5
HP:6  Str:4  Mor:4  MR:3  Armor:1
Mace 1-5
HP:8  Str:5  Mor:5  MR:3  Armor:1
Broadsword 1-6(+1)
HP:14  Str:6  Mor:5  MR:3  Armor:0
Longbow 1-4(+1), range 6
Dagger 1-3(+3)
HP:16  Str:6  Mor:5  MR:3  Armor:1
Mace 1-5(+4)
HP:10  Str:4  Mor:4  MR:5  Armor:0
Boulder 1-30, range 16, siege, reload 1 round
Shortsword 1-5
Rakshasa
No description
Basic Recruitment:
HP:2  Str:2  Mor:2  MR:2  Armor:0
Mace 1-5(-2)
HP:2  Str:2  Mor:2  MR:2  Armor:0
Bow 1-3(-2), range 5
Bite 1-2
HP:5  Str:4  Mor:3  MR:3  Armor:0
Bow 1-3, range 5
Dagger 1-3
HP:6  Str:4  Mor:3  MR:3  Armor:0
Mace 1-5
HP:14  Str:6  Mor:5  MR:3  Armor:0
Longbow 1-4(+1), range 6
Dagger 1-3(+3)
HP:16  Str:6  Mor:5  MR:3  Armor:1
Mace 1-5(+4)
HP:10  Str:4  Mor:4  MR:5  Armor:0
Boulder 1-30, range 16, siege, reload 1 round
Shortsword 1-5
Command Line Options
The following options can be used to modify the behavior of the game before it starts up. Most players will not need to use this feature.
-v      --version               Print version info and exit
-d                              Increase debug level
        --noedgescroll          Don't scroll map when mouse is at the edge of the screen
        --nofastexit            Ask for confirmation on quit.
        --autosave              Save game every turn
        --gamelog=NAME          Create a game log of current standings with this file name
        --movedelay=X           The time in ms to animate each human move (0=instant)
        --aidelay=X             The time in ms to show each AI move. (0=don't show)
        --defbatspeed=X         Default replay speed of battles (1-7, 3=default)
        --showindeps            Show the independents moving
        --noshowindeps          Don't show the independents moving
        --showspecind           Show special important independents moving
        --noshowspecind         Don't show special important independents moving
        --showallies            Show when allied computer players move
        --noshowallies          Don't show when allied computer players move
        --showstupids           Show when friendly stupid commanders move
        --noshowstupids         Don't show when friendly stupid units move
        --rename                Allow renaming of commanders
        --graphs                Allow viewing of score graphs during the game
        --padmode               Run game with a tablet interface
        --notips                Don't show any tip of the turn
        --tokenstats=X          How many details to show on tokens in fight 0-3 (def 3)
        --warning               Warn when ending turn with AP left
        --nonametags            Don't draw names on commander token during setup

******* Graphics Options *******
-u      --fullscreen            Fullscreen mode
        --res=X*Y               Fullscreen resolution
-w      --window                Windowed mode
        --winres=X*Y            Size of window in pixels (default 960*720)
-f      --nofade                Don't use fade effects
-t      --textonly              Run in text only mode (only for servers)
        --maxfps=NBR            Maximum frames per second (default 60)
        --opacity=NBR           Alpha in % for GUI windows (default 85)
        --maxtexsize=X          Limit maximum texture size (maximum width, e.g. 512)
        --quality=X             Set graphics quality 9-12 (default 12)
        --textsize=X            Text size in percent of normal (default 100)
        --noglext               Don't use any OpenGL extensions
        --noglfinish            Don't flush the graphics pipeline each frame
        --glfinish              Flush the graphics pipeline each frame
        --disp=NBR              Use this display device (-1=def., 0=first, 1=second...)
        --multisample=X         Use multisample antialiasing 0-16 samples (default 0)
        --filtering=X           Quality of OpenGL filtering 0-3 (default 3)

******* Sound Options *******
-s      --nosound               Disable all sound
        --musicvol=NBR          Volume for music 0-100 (default 100)
-m                              Music volume 0
        --fxvol=NBR             Volume for sound effects 0-100 (default 90)
        --clicksound            Enable click sound
        --defsound              Use default sound device
        --jack                  Use this sound device (Linux)
        --pulseaudio            Use this sound device (Linux)
        --arts                  Use this sound device (Linux)
        --alsa                  Use this sound device (Linux)
        --oss                   Use this sound device (Linux)
        --directsound           Use this sound device (Windows)
        --waveout               Use this sound device (Windows)
        --portaudio             Use this sound device (Mac)
        --sdlsound              Use this sound device (Mac)

******* Network Options *******
-S      --server                Start game server
-c      --client                Connect to game server at startup
        --port=NBR              Use this port number
        --ipadr=ADR             Connect to this ip-adr
        --noturnintoai          Don't allow disconnected players to be turned into AI
        --noturnsound           No sound effect when a new turn is available
        --lobbyclient           Enter gamelobby

******* New Game Options *******
-n      --newgame               Start new game
        --loadmap=FILE          Load this map for new game
-r      --randommap             Use random map for new game
        --mapw=NBR              Width in squares for random maps (default 50, max 100)
        --maph=NBR              Height in squares for random maps (default 36, max 100)
        --society=NBR           Society for new games (0-6, 0=random, 1=dark ages, ...)
        --northpart=NBR         Percent of map for arctic terrain (default 30)
        --southpart=NBR         Percent of map for southern terrain (default 35)
-b      --battlereports         Don't show battles when they occur, create reports instead
        --clusterstart          Enable clustered start for allied players
        --noclusterstart        Disable clustered start for allied players
        --commoncause           Only lose if no team member has a citadel or commander
        --nocitynames           Do not create names for cities and forests
        --wilder                Increases the strength of independents considerably
        --subsoc                Enable non random choice of sub society
        --mapeditor             Start the map editor
        --nomods                Do not enable any mods
        --loadmod=NAME          Enable this mod, e.g. --loadmod=testmod.c5m
        --unique                Unique classes for all random players